Within the species coffea arabica, which produces the vast majority of high quality coffee, there are a large number of varieties. As consumers have become more interested in the nuances of coffee flavor, more attention has been given to the effects of plant variety. Here are some of the major coffee varieties, which you might see listed on your bag of coffee.
Typica - Historically the most commonly grown coffee variety, Typica is the coffee against which all other varieties are judged. The ancestors of modern Typica originated in Yemen, but in the 17th and 18th centuries were taken through India to Java, then sequentially to Amsterdam, Paris, and Martinique, before being exported to Latin America, Brazil, and Africa. Now grown worldwide.
Bourbon - In the 18th century, a mutation of Typica was found growing on the island of Bourbon (now known as Reunión, located off the coast of Madagascar) which was higher-yielding and more disease-resistant than Typica. Bourbon is also known for its sweetness and citrus-like acidity. Now grown mainly in Central America, especially in Guatemala and El Salvador.
SL28 & SL34 - Bourbon plants were also exported to Tanzania, then Kenya by French missionaries. Of these French Mission Bourbon varieties, two were selected by a coffee research institute, Scott Labs, as being of particularly high quality and suited to the dry Kenyan climate. SL28 & 34 produce a full-bodied cup with good acidity, often with notes of blackberry and blackcurrant. Kenya grows the vast majority of this prized coffee.
Caturra - A mutation of Bourbon discovered in Brazil in 1935, which was higher-yielding still. Very common throughout Latin America. Caturra can produce high-quality coffee, but even experienced coffee tasters probably wouldn't be able to distinguish a Caturra from a Typica in a blind tasting.
Catuai - A hybrid of Caturra and Mundo Novo (which is itself a natural hybrid of Bourbon and Typica). Catuai is high-yielding, and can produce good coffee, but, like Caturra, is not particularly distinctive. Grown in Brazil and Latin America.
Pacamara - A hybrid of Pacas, a descendent of Bourbon, and Red Maragogipe, a mutation of Typica. Developed in El Salvador in 1958, and still mainly grown there. Pacamara plants produce extremely large beans and often display a jasmine aroma.
Ethiopian heirloom varieties - Ethiopia is the birthplace of coffee, and most Ethiopian coffee is produced from native plants. The genetic diversity of Ethiopian coffee plants is far greater than the diversity of cultivated varieties, and Ethiopian coffee can display a huge range of flavors.
Gesha - A wild Ethiopian variety of coffee which was exported to Panama in the 1960s for its disease-resistance, but was found to be relatively low-yielding and therefore was not widely planted. In 2004, the variety was rediscovered when La Esmerelda, a farm in Panama, won the national Cup of Excellence competition with their Gesha coffee. Since then, it has become specialty coffee's most sought after coffee, at one point selling for $170 a pound—unroasted! Gesha is known for its intense floral aromatics, reminiscent of its Ethiopian heritage.
Sources:
http://www.atlascoffee.com/pacamara.pdf
http://wetmill.tumblr.com/page/2
http://www.coffeereview.com/article.cfm?ID=161
http://www.terroircoffee.com/content/view/260/

Thursday, December 27, 2012
Monday, December 24, 2012
San Diego Breweries
Over the past decade, San Diego has emerged as the leading beer city in America, possibly the world. With over 48 craft breweries in the county, mostly focused on beer geek styles like double IPAs, imperial stouts, and sour beers, it's certainly worth a visit. Before returning home for break, I spent some time with my Angry Monocle co-conspiritor, Jack, seeking out the finest ales San Diego had to offer. Here are some thoughts.
Day 1:
Breakwater Brewing Company, Oceanside – A bustling brewpup in downtown Oceanside. We were drawn in by the Biere du Jour, a raspberry-hibiscus mead blended with stout and aged in Brettanomyces-inhabited wine barrels. Strange, to say the least. Not much stout character left. I'm not a fan of hibiscus, so that was off-putting to me, but the main problem was the intensely dry, empty finish. Reminded me of something Dogfish Head might make. We also had a decent double IPA.
Pizza Port, Carlsbad – Raucous: family-style seating, with children to match. This was my second visit to a Pizza Port; I had previously been to their location in San Clemente. The pizza is quite good: I'm a fan of the Pizza Carlsbad, with pesto, mesquite grilled chicken, sun-dried tomatoes, artichoke hearts and feta. A good IPA is one of the few drinks that pairs well with artichoke. Pizza Port is known for their IPAs, so both of my visits I've ordered one. I don't remember the names, but they were both tap-only house beers, and both were underwhelming—lacking the intense aromatics I look for in a fresh IPA. However, I did also order a pint of Alpine's Duet IPA, which was hands down the best of the 11 IPAs I tasted that weekend. Super clean bitterness with pungent floral aromatics.
Lost Abbey, San Marcos – Located in one of the many industrial parks we visited, Lost Abbey is worth a visit just for its open-to-the-public barrel room. Unfortunately, there wasn't a single sour on tap, so we split a pint of Old Viscosity and moved on, after ogling the multitude of barrels with unconcealed envy.
Day 2:
Societe Brewing Company, San Diego – One of the nicer-looking tasting rooms we visited. I guess it should be, since Societe is only six months old. We had a few IPAs, which were all well-made and interesting, but none of which blew me away. I think my favorite of their beers was actually a Belgian pale ale called The Harlot. Definitely a brewery to watch, as they have a sour program going that should come to fruition in the next couple of years. Given the brewers' experience at Russian River and The Bruery, I'm excited to see what they turn out.
Toronado (Bar), San Diego – Hell of a bar. Had my first taste of Rodenbach Grand Cru (!). Also a couple more Alpine beers. Odin's Raven, an imperial stout, was flawless but uninspiring. Keene Idea, a double IPA with Nelson Sauvin hops, was incredibly pungent and unique, but I actually found the gooseberry hop aromatics in this beer to be off-putting (hints of onion). Food was ok. Burgers were generously thick—too thick, if you ask me—and the bottom bun was sopping wet by the time I was served. Also, a side of 'chips' meant potato chips, not french fries, which was a disappointment. Still, the astoundingly awesome tap list makes it hard for me to complain about this place.
Day 3:
Rough Draft Brewing Company, San Diego – We had some IPAs here. Hop Therapy, a double IPA, had a really nice melon note to it. Don't remember much else. The bartender wore bright red lipstick. There seemed to be a fair number of regulars.
Blind Lady Ale House & Automatic Brewing Company, San Diego – We tried to come here on Day 2, but it was closed for a private event involving Will Ferrell. We tried Automatic's Equal Rye & Justice, a rye pale ale dry hopped with Citra, which was pretty good. Looked like they had good food.
Green Flash – More taps than any of the other tasting rooms we'd been to. Some very interesting beers, such as Candela, a rye barleywine aged on cedar. Conclusion: don't age beer on cedar. Some of their IPAs were pretty good, but I still haven't found another Green Flash beer that comes close to their Double Stout.
Stone Brewing Company, Escondido – Classy restaurant. None of the Stone beers on tap looked terribly exciting. Had a bottle of Drie Fonteinen Oude Geuze, which was terribly exciting. Also had a glass of Stillwater's Cellar Door saison, which I didn't much care for. Something tasted off. Might've been the sage they added. The food was good, but not great, considering the classiness of the restaurant.
Part 2:
When I visited my uncle in San Clemente recently, we drove down to his friend Steven's place in Encinitas and brewed a rhubarb saison on his ($5,000) Sabco system. Since we started brewing at 6am, we were finished by mid-morning, and decided to make a couple more stops while we were in the area.
Ballast Point: An excellent selection of exclusive taps from their pilot system, including a few barrel-aged offerings, such as 2010 Three Sheets barleywine, aged in Syrah barrels. Well-made, but too oxidized for my tastes. Their brandy barrel-aged Navigator doppelbock, however, was the best doppelbock I've had. And, of course, Sculpin fresh from the brewery is about as good as it gets.
White Labs: This yeast lab hosts a tasting room where you can try the same beer fermented with several different yeasts. When we visited, they were featuring saison, hefeweizen, and robust porter. To be honest, I didn't think any of the saisons were very good. Two of the hefeweizens were quite good: the one fermented with WLP300 (the classic hefe strain) had typical banana aroma, with a dry wheat finish, while the one fermented with WLP380 (a different strain from Weihenstephan), had similar aromatics, but a cleaner, fruitier finish, with a bit more tartness. I was glad to find that the robust porter fermented with WLP007 (which I used for my porter) was the best of the four porters. WLP004 (Irish ale) was also decent, but sweeter and less aromatic. The porter with WLP011 (European ale) had some interesting esters, but did not compliment the roasted malts very well. The porter with WLP001 (California ale) was boring as heck.
Sunday, December 23, 2012
Berliner Weisse (12/23/12)
This was my first attempt at a Berliner Weisse. For this batch I pitched lactobacillus at the same time as brewer's yeast, and let it ferment at 70F for several months. It never developed anywhere near the level of sourness that I wanted, so for subsequent batches I radically changed my approach to souring.
Vitals:
Yeast: 1/2 packet Nottingham, 2 packs of Lactobacillus delbruckii (Wyeast @ almost 6 months, White Labs @ 1 month but left 1 week unrefrigerated)
Starter: Wyeast lacto starter: 2 liters (1/2 DME, 1/2 cane sugar) for 5 days; no starter for White Labs lacto
Original Gravity (Calc): 1.034
Final Gravity (Measured): 1.002
ABV (Est): 4.1%
IBUs (Tinseth calcuation): 6
Strike temp: 165F
Mash in: 155F
End of mash: 149F
Mash length: 60 minutes
Mash thickness: 1.5 qt/lb
Mash efficiency: 63%
Pitching temp: 68F
1/3/13: Gravity is 1.004. Some mild esters in the aroma, but overall the beer is dominated by the sweetness of the doughy wheat malt. No bitterness to speak of. Some tartness, but less than I'd like. Added 3.75 lbs of thawed whole blackberries from Whole Foods.
2/13/13: Gravity at 1.002. Disappointing aroma and flavor.
2/22/13: Added 1 vial of Brett Brux.
3/1/13: Bottled to 2.5 volumes of CO2.
Vitals:
Yeast: 1/2 packet Nottingham, 2 packs of Lactobacillus delbruckii (Wyeast @ almost 6 months, White Labs @ 1 month but left 1 week unrefrigerated)
Starter: Wyeast lacto starter: 2 liters (1/2 DME, 1/2 cane sugar) for 5 days; no starter for White Labs lacto
Original Gravity (Calc): 1.034
Final Gravity (Measured): 1.002
ABV (Est): 4.1%
IBUs (Tinseth calcuation): 6
Strike temp: 165F
Mash in: 155F
End of mash: 149F
Mash length: 60 minutes
Mash thickness: 1.5 qt/lb
Mash efficiency: 63%
Pitching temp: 68F
| Malts Mashed | Amount | % | Max Pts. | |
| White Wheat | 2 | 27% | 40.00 | |
| 2 Row | 5.5 | 73% | 36.00 | |
| Hops/Additions | Amount | Time | AA% | |
| Spalt | 0.75 | 20 | 4.0% | |
1/3/13: Gravity is 1.004. Some mild esters in the aroma, but overall the beer is dominated by the sweetness of the doughy wheat malt. No bitterness to speak of. Some tartness, but less than I'd like. Added 3.75 lbs of thawed whole blackberries from Whole Foods.
2/13/13: Gravity at 1.002. Disappointing aroma and flavor.
2/22/13: Added 1 vial of Brett Brux.
3/1/13: Bottled to 2.5 volumes of CO2.
Saturday, December 1, 2012
Coffee Extraction
Coffee brewing advice is often hard to trust, due to much of the industry's lack of scientific knowledge, and the fact that most of the people giving the advice are trying to sell some fancy new brewing device. For exactly this reason, the most important coffee-related invention of the past few decades isn't a coffee brewer, grinder, or filter. It's a refractometer.
Both of these extremes are undesirable. While consumer preferences regarding coffee strength vary significantly, preferences regarding level of extraction are remarkably consistent. Coffee strength is expressed as the percentage of the brewed coffee that consists of dissolved coffee solids (% TDS). The Specialty Coffee Association of America recommends that brewed coffee consist of 1.15% - 1.35% TDS, while the Specialty Coffee Association of Europe recommends 1.2% - 1.5% TDS. These numbers are flexible; a ristretto shot of espresso can be upwards of 10% TDS and delicious.
Extraction yield is far less flexible. Extraction is expressed as the percentage of the ground coffee that is dissolved into the brewed coffee. The SCAA and SCAE recommend 18% - 22% extraction for both brewed coffee and espresso. This means that about one-fifth of the coffee in your brewer should end up in your cup, regardless of how strong you like your coffee.
Refractometers, as the name suggests, measure the refractive index of a material (i.e., the amount that light bends when passing through said material). If that material is a liquid, a refractometer can be used to measure how much stuff is dissolved in the liquid—the total dissolved solids (TDS)—by measuring the difference between the refractive index of the solvent (e.g., water) and the solution (e.g., brewed coffee). Of course, refractometers have been around since the 19th century, but it wasn't until 2008, when VST Technologies released a refractometer specifically designed for coffee, that specialty coffee shops started using them to measure coffee strength and extraction yields. (I'm sure the fact that VST released an iPhone app to go with the refractometer helped to encourage adoption.)
So why is this important? Don't we already know how to make coffee stronger or weaker? Just use more or less coffee! Well, yes, but there is a crucial distinction between strength and extraction. One might take a very small amount of coffee and boil it for an hour, or take a large amount of coffee and steep it in cold water for a few seconds. The resulting solutions might be the same strength, but would have very different levels of extraction. The boiled coffee would contain nearly all the soluble solids from the coffee grounds, while the coffee steeped for a few seconds would contain only a small fraction of those soluble solids.
Extraction yield is far less flexible. Extraction is expressed as the percentage of the ground coffee that is dissolved into the brewed coffee. The SCAA and SCAE recommend 18% - 22% extraction for both brewed coffee and espresso. This means that about one-fifth of the coffee in your brewer should end up in your cup, regardless of how strong you like your coffee.
Where did these numbers come from? The Coffee Brewing Institute (long since defunct) first studied consumer preferences for extraction levels in the 1950s, and their research has since been replicated by multiple organizations in several countries. The CBI originally came up with 17.5% - 21.2%, but more recent studies have settled on 18% - 22%. More information on these studies can be found in a post by Vince Fedele, head of VST. The point is, this number is based on empirical evidence regarding the preferences of the general public.
Overextraction results in intensely bitter coffee, while underextracted coffee is usually sour and lacking in complexity. The distinction between sourness and acidity is, as far as I can tell, unique to coffee. Acidity is generally a desirable characteristic in coffee; sourness refers to an acidic coffee that lacks the sweetness to balance its acidity. Since the caramelized sugars that give coffee its sweetness are less soluble than acids (the main acids in coffee are citric and malic), underextracted coffee is often sour in this sense.
Overextraction results in intensely bitter coffee, while underextracted coffee is usually sour and lacking in complexity. The distinction between sourness and acidity is, as far as I can tell, unique to coffee. Acidity is generally a desirable characteristic in coffee; sourness refers to an acidic coffee that lacks the sweetness to balance its acidity. Since the caramelized sugars that give coffee its sweetness are less soluble than acids (the main acids in coffee are citric and malic), underextracted coffee is often sour in this sense.
The ultimate goal of any coffee brewer, therefore, is to achieve extraction yields of 18% - 22%. Extraction yield is affected by a number of variables, including: water temperature, grind size, brew time, agitation, coffee/water ratio, water profile, and coffee density and roast level. The problem is that the only way to measure extraction directly is to dry the spent grounds in an oven and weigh them, a process that takes hours and careful attention to detail. Because of the difficulty of measuring extraction, for decades the only people doing so were at large research institutes. However, if one could accurately measure the strength of the brewed coffee and the mass of the ground coffee and brew water, it would be possible to calculate extraction yield by the following formula: Extraction[%] = BrewedCoffee[g] * TDS[%] / CoffeeGrounds[g]. The mass of coffee grounds and brewed coffee can be easily measured with a scale, but measuring TDS is more difficult.
An affordable option is to buy a cheap TDS meter, such as those used to measure water quality. I bought one of these, but found that my readings varied wildly. The refinement provided by VST's coffee refractometer was a major improvement. Unfortunately, the device costs $400, which is more than I could justify to myself; but for a café that has already spent thousands upon thousands of dollars on espresso machines and grinders, spending $400 to ensure consistent quality is a small price.
The emergence of an objective measure of quality is powerful. 18%-22% extraction does not guarantee a great cup of coffee; the coffee itself still has to be good. But extraction yield is an objective evaluation of the brewing method, allowing for further empirical research into coffee brewing. Two significant results were presented at this year's Nordic Barista Cup. The first was a study by David Walsh reconfirming the validity of the 18%-22% extraction preference, while also suggesting a secondary preference for extractions at 12.5%-14.5%.
The second was an analysis by Vince Fedele of the liquid retained by the coffee grounds after brewing. The standard equation for calculating extraction yield from brew strength disregards any coffee extracted by the liquid retained by the spent coffee grounds. This assumption turns out to be roughly true of percolation brewing methods (drip, espresso), but not of infusion methods (e.g., French press, syphon/vacuum, Aeropress). When brewing by percolation, the liquid retained by the coffee has only been in contact with the coffee for a short time, and hence has extracted very little coffee. When brewing by infusion, on the other hand, the retained liquid has been in contact with the coffee for the entire brewing process. Therefore, the liquid retained by an infusion brewer has a significant quantity of coffee solids in solution; the retained liquid is coffee of essentially the same strength as the cup you just brewed. The standard extraction formula doesn't take this extra extraction into account. Practically, this means that to brew coffee to the same strength and extraction by infusion requires ~10% more ground coffee, to account for the brewed coffee that is retained by the grounds.
In addition to allowing cafés and consumers to improve their brewing practices, fast and easy measurement of extraction is a valuable tool for engineers developing coffee equipment. For example, soon after developing the VST refractometer, Vince Fedele used his invention to identify a major weakness in commercial espresso machines—the portafilter basket—and develop an improvement.
But more than anything else, I appreciate the development of the VST refractometer, and the renewed focus on extraction it brought with it, for the simplicity it provides. Though extraction is a complex concept, it is a single, measurable number which tracks quality of brewing methods.
There's one major caveat to these extraction numbers, which is that they're based on what our grinders actually produce. Even the best burr grinders on the market produce a significant quantity of grinds that are finer than desired. These fines extract more quickly than the rest of the coffee, which puts a limit on how high we can push our extraction yield without overextracting. If you have a low-quality grinder (e.g., a blade grinder), even an 18% extraction is going to taste over extracted, due to the wide variation in grind size. Experiments with sifting ground coffee, which removes the fines, suggest that a perfectly even grind would allow extraction up to 23% or 24%. (Matt Perger won this year's World Brewer's Cup with sifted coffee at 23% extraction.) But sifting is impractical in most settings, so until the next grinder revolution, we're stuck with a 22% ceiling.
There's one major caveat to these extraction numbers, which is that they're based on what our grinders actually produce. Even the best burr grinders on the market produce a significant quantity of grinds that are finer than desired. These fines extract more quickly than the rest of the coffee, which puts a limit on how high we can push our extraction yield without overextracting. If you have a low-quality grinder (e.g., a blade grinder), even an 18% extraction is going to taste over extracted, due to the wide variation in grind size. Experiments with sifting ground coffee, which removes the fines, suggest that a perfectly even grind would allow extraction up to 23% or 24%. (Matt Perger won this year's World Brewer's Cup with sifted coffee at 23% extraction.) But sifting is impractical in most settings, so until the next grinder revolution, we're stuck with a 22% ceiling.
Saturday, November 24, 2012
Tea Processing and Brewing
A recent trip to a tea shop made me realize that I no longer have a firm grasp on all of the distinctions between tea processing methods, due to my focus on coffee. Obviously this is unacceptable.

I will limit my discussion here to the five most common types of tea, leaving aside such rarities as yellow tea. I will also avoid discussion of non-tea 'tea', i.e., steeped plant matter that is often called tea but not made from Camellia sinensis (e.g., herbal blends, rooibos, honeybush, yerba mate). The types of tea I'll discuss are: black, green, oolong, and white. All four types are made from the same species of plant, which has two main varieties. Most Chinese, Taiwanese, and Japanese teas are made from the variety Camellia sinensis sinensis, which has a low yield but a smooth, sweet flavor. Most Indian and Ceylon (Sri Lankan) teas are made from Camellia sinensis assamica, or a hybrid of the two varieties. Assamica is higher yielding and stronger in flavor.
Processing
Black tea has the longest tradition of consumption in the western world. The major producers of black tea are India (Assam, Darjeeling, Nilgiri), Sri Lanka (Ceylon), and China (Keemun, Yunnan, Lapsang Souchong). Black tea processing consists of four stages. After picking, the fresh tea leaves are left out in the sun to dry (though not completely), a process known as withering which lasts 8-24 hours. Then the leaves are sent through heavy metal rollers which bruise the leaves, rupturing the cell walls of the tea and exposing its innards to the air. The bruised leaves are left until fully oxidized. The leaves are then fired in a heated drying chamber, which removes the remaining moisture. Ready to drink.
Green tea production and consumption is centered in China and Japan. Some famous Chinese green teas include Long Jin (Dragon Well), Huang Shan Mao Feng, and Bi Luo Chun. Sencha dominates Japanese tea production. Green tea differs from black tea in that green tea is unoxidized. After picking, the leaves are immediately exposed to heat in order to deactivate oxidative enzymes. In China, this is typically accomplished through pan frying or baking, while the Japanese use steam. After de-enzyming, the leaves are rolled into the desired shape, often by hand. The shape of a green tea leaf may identify the variety of tea; Bi Luo Chun, for instance, is rolled into a distinctive spiral. Finally, the shaped leaves are fired to remove the remaining moisture.
Oolong's flavor lies between green and black tea, because oolongs are partially oxidized, with levels of oxidation ranging from 8%-85%. Oolong is mainly produced in China and Taiwan (AKA Formosa). Some famous dark oolongs include Da Hong Pao (Red Robe) and Dongfang Meiren (Oriental Beauty). Some famous green oolongs include Tieguanyin (Iron Goddess) and Dongding. Oolong processing is quite involved. Oolong leaves are allowed to grow larger and more mature before picking, which makes for slower oxidation, allowing the processor a greater degree of control. After picking, the leaves are withered for no more than a few hours. They are then carefully and gently bruised through hand-tossing in baskets. The bruised leaves are left until the desired level of oxidation is achieved, then pan-fried to halt the oxidation process. The leaves are rolled into shape and then fired. Many oolongs are then roasted over low heat for hours or even days, which adds roast flavor, further reduces moisture and improves the tea's longevity.
White tea is produced mainly in China. There are three traditional Chinese varieties: Baihao Yinzhen (Silver Needle), Bai Mudan (White Peony), and Shou Mei, listed here in order of price and prestige. White tea is processed in much the same way that natural processed coffee is: it's picked and then left in the sun until dry (mechanical driers are also sometimes used). A modicum of oxidation occurs during drying. The result is a mellow, sweet, and nutty cup of tea.
Pu-erh is a unique form of tea produced in the Chinese province of Yunnan from assamica plants. Pu-erh comes in two forms: raw and ripe. Raw pu-erh is essentially a green tea that is sun-dried rather than kilned after rolling, resulting in a modicum of oxidation. It tends to taste pretty rough when fresh, so it's usually aged for long periods of time before consumption, which slowly darkens the tea and smooths out the flavor, as well as adding complex, earthy aromas. Ripe pu-erh is a more recent invention, intended to mimic the flavor of aged raw pu-erh. Ripe pu-erh is made from raw pu-erh which is moistened and piled in heaps, then monitored and turned regularly for 6 - 12 months. The damp, warm environment increases microbial activity. Raw and ripe pu-erh are available in both loose leaf and compressed form; pressed pu-erh ages more gracefully.
Pu-erh is a unique form of tea produced in the Chinese province of Yunnan from assamica plants. Pu-erh comes in two forms: raw and ripe. Raw pu-erh is essentially a green tea that is sun-dried rather than kilned after rolling, resulting in a modicum of oxidation. It tends to taste pretty rough when fresh, so it's usually aged for long periods of time before consumption, which slowly darkens the tea and smooths out the flavor, as well as adding complex, earthy aromas. Ripe pu-erh is a more recent invention, intended to mimic the flavor of aged raw pu-erh. Ripe pu-erh is made from raw pu-erh which is moistened and piled in heaps, then monitored and turned regularly for 6 - 12 months. The damp, warm environment increases microbial activity. Raw and ripe pu-erh are available in both loose leaf and compressed form; pressed pu-erh ages more gracefully.

Brewing
Different types of tea require different brewing techniques. Though all tea should be steeped in hot water, the temperature of the water, the ratio of tea to water, and the length of the steep all vary by the type of tea. To a certain extent brewing practices are culture-dependent—in China, for example, even black tea is generally steeped for a shorter period of time with more tea (compared to Western practice)—so it's worth experimenting with tea/water ratios and steep times, but these traditional methods are a good starting point.
Black tea should be steeped in water of at least 200˚ for about four minutes, though you may want to steep longer if you wish to add milk. About 2 tsp of tea per 8 oz of water should be used; use more if the tea leaves are particularly large, less if they're broken or small. You can steep black tea up to two times.
Green tea should be steeped in ~180˚F water for 2-3 minutes. About 3g / 150ml (2 tsp / 5 oz) should be used. Green tea yields 2-4 infusions.
White tea should also be steeped at ~180˚F, but the steep should be closer to five minutes. About 3g / 150ml (2 tsp / 5 oz) should be used. White tea also yields 2-4 infusions.
Because the processing of pu-erh breaks down most of its tannins, it's near impossible to over-steep. However, it is generally prepared gongfu (see below). In any case, it should be given a quick rinse with hot water before brewing, which removes any impurities on the tea.
Because the processing of pu-erh breaks down most of its tannins, it's near impossible to over-steep. However, it is generally prepared gongfu (see below). In any case, it should be given a quick rinse with hot water before brewing, which removes any impurities on the tea.
Oolong tea can be brewed in the same manner as green tea, but traditionally brewing oolong involves a more complex protocol, known as gongfucha. Water between 180˚ and 200˚F should be used, depending on how oxidized the oolong is. The bare bones of gongfucha are as follows:
1. Pre-heat the tea equipment with hot water.
2. Fill small teapot (3-8 oz) 1/4 – 1/3 full of tea, or 5 – 8 grams / 4 oz. Traditionally, an Yixing clay pot dedicated to brewing oolong is used.
3. Rinse the tea leaves: fill the teapot halfway with hot water, then discard immediately.
4. Fill the teapot full of hot water.
5. Steep for 30 seconds. Pour into a serving vessel, then into several small cups. (This isn't the kind of thing you do alone.) 5 - 8 infusions should be performed in close succession. Increase steep time by ~10 seconds for each subsequent infusion.
Sources:
http://www.esgreen.com/
http://www.youtube.com/watch?v=0Mu0H-Uxasc/
http://www.peets.com/learn/tea_processing.asp
http://www.stoneleaftea.com/roasted-oolong-tea/
http://floatingleavestea.blogspot.com/2011/10/basic-taiwanese-oolong-making-process.html
http://www.stoneleaftea.com/roasted-oolong-tea/
http://floatingleavestea.blogspot.com/2011/10/basic-taiwanese-oolong-making-process.html
Thursday, November 22, 2012
Coffee Processing Revisited
One of the first aspects of coffee to catch my attention was coffee processing, the steps involved in extracting the coffee seed (bean) from the fruit. I noticed that all of the coffees that I liked most at Peet's were either natural processed or wet-hulled. As I started drinking lighter roasts, my tastes turned to classically washed coffees. So clearly my original conception that the flavor of a coffee is just a result of how the coffee was grown and roasted was misguided.
However, I didn't have a good understanding of what the specific differences between different processing methods were, in large part due to ignorance about the steps involved and the plethora of synonymous terms used for processing methods. So I did some research and made a chart. Since then, I've discovered some finer-grained distinctions in processing methods, so at this point I think the information will probably be better presented in prose. All this information is available elsewhere, but I haven't found anywhere online where all of the details that I'm interested in have been collected in a concise and readable manner. If you're already familiar with the basics of coffee processing, you can skip this next bit.
Understanding the differences between processing methods requires understanding the steps involved in processing, which in turn requires understanding the anatomy of the coffee fruit. It starts out looking like this:

The outer skin of the coffee fruit is known as the pulp. The gooey flesh of the fruit inside the pulp is called mucilage. Inside the mucilage is a membrane surrounding the seed, known as parchment. What follows is a brief description of the five stages involved in coffee processing: pulping, fermentation, washing, drying, and hulling. Note that not all processing methods utilize all of these stages, as I will discuss below.
The pulping stage involves removing the skin of the fruit, which is done mechanically. Then comes fermentation, when the de-pulped fruit, the gooey mess you see below, is let sit to allow microbes to break down the mucilage.
 After fermentation, more water is used to wash off the loosened mucilage, and the result is parchment coffee, which is just the coffee seed and the innermost layer of parchment. The parchment coffee is then dried. (Dried parchment coffee shown below.)

Once dried, the parchment coffee is sent through hulling machines to remove the parchment, and the green coffee is ready to ship to the roaster.

1. Wet Process AKA Washed Coffee:
The vast majority of arabica coffee is wet processed. What characterizes all wet processing methods is the use of water to remove the mucilage. The most significant differences between different wet processing methods are: length of fermentation; whether water is added during fermentation (dry fermentation vs. wet fermentation); and moisture content at hulling. Wet processing is the most consistent method of producing defect-free coffee.
1.1 Latin American method
The coffee is pulped, then dry fermented for up to 24 hours. Water is introduced to wash off the loosened mucilage, followed by drying and hulling.
1.2 Kenyan method
The coffee is pulped, then dry fermented for up to 3 days. Water is used to wash the coffee, which is then soaked for 24 hours. The parchment coffee is then dried and hulled.
1.3 Ethiopian method
The coffee is pulped, then wet fermented for up to 3 days. More water is used to wash the coffee, which is then dried and hulled.
1.4 Wet-hulling (Indonesian method)
The coffee is pulped, then dry fermented overnight (usually; my sources conflict on this). The coffee is hand-washed, followed by a short period of drying. The parchment coffee is hulled before it has fully dried (i.e., more than 11% moisture remains), leaving the green coffee exposed to the environment while still moist and hence bacteria-friendly. This process results in increased body, lower acidity, and a distinctly rustic, earthy character.
1.5 Machine-assisted wet process
Some farms use elaborate machines called mechanical demucilagers to pulp and wash the coffees all at once, without a distinct fermentation stage. These can also be used to only partially remove the mucilage, resulting in a coffee that rests somewhere between washed and pulped natural. This type of coffee is sometimes called honey processed, though that term is also used to describe pulped naturals, a dry processing method.
A note on semi-washed. This term is the cause of much confusion in discussions of coffee processing. It is used to refer to either wet-hulled coffee or coffee that has been partially demucilaged mechanically, two distinct processes that produce dramatically different coffees. I prefer to avoid the term altogether.
2. Dry Process:
Dry processed coffees are produced without removing the mucilage prior to drying.
2.1 Natural Process
The coffee is not pulped after picking; rather, it is immediately laid out to dry in the sun, a stage which lasts for 2-4 weeks. When the coffee has fully dried, it is sent through a hulling machine, which removes the pulp, mucilage, and parchment all at once. Like wet-hulling, this process results in increased body and lower acidity, but generally has a bit less earthiness, greater complexity and can result in intense dark berry and wine-like flavors.
Most natural processed arabica comes from Yemen, Ethiopia, and Brazil. Brazilian natural and pulped natural coffee forms the base of most classic espresso blends. There is an important distinction between the way that Brazilian and Ethiopian natural processed coffee is generally harvested. In Ethiopia, the coffee is hand-picked over a period of time to ensure that all the coffee is at the same level of ripeness when picking, while in Brazil, farmers generally wait until the coffee is extremely ripe and then mechanically strip-pick the trees, which means that many of the coffee cherries have already begun to dry on the branches. Brazilian naturals tend to be nutty and mild, while Ethiopian naturals tend to be powerfully fruity.
2.2 Pulped Natural AKA Honey Process
The coffee is pulped after picking. When the coffee is dry, a hulling machine removes the mucilage and parchment. The flavor of pulped natural coffee rests between washed and natural processed coffee. Pulped natural coffee is produced around the world but is especially associated with Brazil.
Drying Methods
All dry processed coffee and most high-quality wet-processed coffee is sun-dried. Confusingly, sun-dried is sometimes used as a synonym for natural processed. African farmers usually dry their coffee on raised beds, while Latin American coffees are generally dried on cement patios.

Sources:
An interview with Peter Giuliano which can be found on James Hoffman's blog (main source)
http://timwendelboe.no/tag/coffee-processing/
http://www.coffeereview.com/article.cfm?ID=199
http://coffeeshrub.com/shrub/blog/confused-naturally
However, I didn't have a good understanding of what the specific differences between different processing methods were, in large part due to ignorance about the steps involved and the plethora of synonymous terms used for processing methods. So I did some research and made a chart. Since then, I've discovered some finer-grained distinctions in processing methods, so at this point I think the information will probably be better presented in prose. All this information is available elsewhere, but I haven't found anywhere online where all of the details that I'm interested in have been collected in a concise and readable manner. If you're already familiar with the basics of coffee processing, you can skip this next bit.
Understanding the differences between processing methods requires understanding the steps involved in processing, which in turn requires understanding the anatomy of the coffee fruit. It starts out looking like this:

The pulping stage involves removing the skin of the fruit, which is done mechanically. Then comes fermentation, when the de-pulped fruit, the gooey mess you see below, is let sit to allow microbes to break down the mucilage.


1. Wet Process AKA Washed Coffee:
The vast majority of arabica coffee is wet processed. What characterizes all wet processing methods is the use of water to remove the mucilage. The most significant differences between different wet processing methods are: length of fermentation; whether water is added during fermentation (dry fermentation vs. wet fermentation); and moisture content at hulling. Wet processing is the most consistent method of producing defect-free coffee.
1.1 Latin American method
The coffee is pulped, then dry fermented for up to 24 hours. Water is introduced to wash off the loosened mucilage, followed by drying and hulling.
1.2 Kenyan method
The coffee is pulped, then dry fermented for up to 3 days. Water is used to wash the coffee, which is then soaked for 24 hours. The parchment coffee is then dried and hulled.
1.3 Ethiopian method
The coffee is pulped, then wet fermented for up to 3 days. More water is used to wash the coffee, which is then dried and hulled.
1.4 Wet-hulling (Indonesian method)
The coffee is pulped, then dry fermented overnight (usually; my sources conflict on this). The coffee is hand-washed, followed by a short period of drying. The parchment coffee is hulled before it has fully dried (i.e., more than 11% moisture remains), leaving the green coffee exposed to the environment while still moist and hence bacteria-friendly. This process results in increased body, lower acidity, and a distinctly rustic, earthy character.
1.5 Machine-assisted wet process
Some farms use elaborate machines called mechanical demucilagers to pulp and wash the coffees all at once, without a distinct fermentation stage. These can also be used to only partially remove the mucilage, resulting in a coffee that rests somewhere between washed and pulped natural. This type of coffee is sometimes called honey processed, though that term is also used to describe pulped naturals, a dry processing method.
A note on semi-washed. This term is the cause of much confusion in discussions of coffee processing. It is used to refer to either wet-hulled coffee or coffee that has been partially demucilaged mechanically, two distinct processes that produce dramatically different coffees. I prefer to avoid the term altogether.
2. Dry Process:
Dry processed coffees are produced without removing the mucilage prior to drying.
2.1 Natural Process
The coffee is not pulped after picking; rather, it is immediately laid out to dry in the sun, a stage which lasts for 2-4 weeks. When the coffee has fully dried, it is sent through a hulling machine, which removes the pulp, mucilage, and parchment all at once. Like wet-hulling, this process results in increased body and lower acidity, but generally has a bit less earthiness, greater complexity and can result in intense dark berry and wine-like flavors.
Most natural processed arabica comes from Yemen, Ethiopia, and Brazil. Brazilian natural and pulped natural coffee forms the base of most classic espresso blends. There is an important distinction between the way that Brazilian and Ethiopian natural processed coffee is generally harvested. In Ethiopia, the coffee is hand-picked over a period of time to ensure that all the coffee is at the same level of ripeness when picking, while in Brazil, farmers generally wait until the coffee is extremely ripe and then mechanically strip-pick the trees, which means that many of the coffee cherries have already begun to dry on the branches. Brazilian naturals tend to be nutty and mild, while Ethiopian naturals tend to be powerfully fruity.
2.2 Pulped Natural AKA Honey Process
The coffee is pulped after picking. When the coffee is dry, a hulling machine removes the mucilage and parchment. The flavor of pulped natural coffee rests between washed and natural processed coffee. Pulped natural coffee is produced around the world but is especially associated with Brazil.
Drying Methods
All dry processed coffee and most high-quality wet-processed coffee is sun-dried. Confusingly, sun-dried is sometimes used as a synonym for natural processed. African farmers usually dry their coffee on raised beds, while Latin American coffees are generally dried on cement patios.

An interview with Peter Giuliano which can be found on James Hoffman's blog (main source)
http://timwendelboe.no/tag/coffee-processing/
http://www.coffeereview.com/article.cfm?ID=199
http://coffeeshrub.com/shrub/blog/confused-naturally
Saturday, October 6, 2012
Roasting Update
I continue to enjoy roasting my own coffee. My batch size is ~65g of roasted coffee, which only lasts me 2–3 days, so I've been roasting several times a week. A couple of weeks ago I decided to modify the popper by bypassing the thermostat, which automatically shuts off the heating element when it gets too hot. I want the popper to get really hot, so the thermostat had to go. One piece of heat-shrink tubing later, the popper was back and better than ever. It now gets hot enough that I don't need to use the lid at all, which gives me a better view of the coffee. One of the best parts of homeroasting is watching the coffee change color as it roasts.


Since I don't have any way to directly measure the temperature of the coffee as it roasts, in order to gain control over my roasting I try to keep track of as many variables as I can. The easiest way to do this is to keep a log.
As you might be able to tell, I haven't had much luck with darker roasts in the popper. I'm not sure if I've lost my taste for dark roasts or if the popper just roasts too quickly to produce a good dark roast. I suspect it's some combination of the two. In any case, I'm happy with the results I've been getting stopping the roast 10 - 60 seconds after the end of first crack (corresponding to a City – Full City roast). I've also tried going lighter, but the very light roasts I've tried (stopping the roast before or during first crack) have been too bready and mild for my taste. The Burundi is definitely my favorite of the four coffees I got from Sweet Maria's. I've discovered that Jones Coffee Roasters (Pasadena) and Klatch Coffee (Upland) also sell green coffee by the pound. I'm excited to get more!
Update: Jones Coffee Roasters no longer sells green coffee. Ordered 5 lbs wet processed Guatemala, 5 lbs wet processed Ethiopia from Sweet Maria's.

This is the Costa Rica. The coffee starts out a pale shade of green.

In the first stage of roasting, the beans turn bright yellow.

As the roast continues, the beans darken to golden brown.

The beans here are nearing first crack. At this point I stop shaking the popper. Shaking the popper in the beginning lengthens the early stages of the roast for more flavor development and helps to ensure evenness.


Once the beans have reached the desired roast (this is Full City, I think), they should be cooled as quickly as possible. The most effective method I've found is to swirl them around a colander (convection cooling) until they're merely warm to the touch, then spread them onto a flat metal surface (conduction cooling) until they reach room temperature. After cooling, I put the coffee in a labeled and dated mason jar. It's important not to seal the jar fully, because the beans release a lot of CO2 after roasting, and exploding jars are no fun.

Since I don't have any way to directly measure the temperature of the coffee as it roasts, in order to gain control over my roasting I try to keep track of as many variables as I can. The easiest way to do this is to keep a log.
| Coffee | Ambient˚ | Mass (1) | Mass (2) | Shaking | 1st Crack Start | 1st Crack End | 2nd Crack | Pull Time | Notes |
| Java | 2:00 | 3:45 | 5:00 | 6:00 | 6:00 | Blech! | |||
| Burundi | 86F | 75g | 4:00 | 4:17 | 5:20 | 6:05 | Good, but more mild than lighter roast | ||
| Brazil NP | 84F | 75g | 4:00 | 4:00? | 5:10 | Still very uneven color, but balanced flavor | |||
| Burundi | 82F | 75g | 3:54 | 3:54 | 5:17 | 5:17 | |||
| Java | 83F | 75g | 5:00 | 5:15 | ? | 6:55 | A bit ashy, but drinkable | ||
| Java | 88F | 75g | 62g | 4:00 | 4:45 | 6:00? | 6:30 | Good balance | |
| Costa Rica | 79F | 75g | 3:00 | 3:40 | 4:55 | 5:10 | Pretty light, definitely city | ||
| Costa Rica | 76F | 75g | 64g | 3:30 | 4:18 | 5:45 | 6:30 | ||
| Costa Rica | 76F | 75g | 66g | 4:45 | 5:26 | 7:09 | 7:26 | 3 stops before 1st crack |
As you might be able to tell, I haven't had much luck with darker roasts in the popper. I'm not sure if I've lost my taste for dark roasts or if the popper just roasts too quickly to produce a good dark roast. I suspect it's some combination of the two. In any case, I'm happy with the results I've been getting stopping the roast 10 - 60 seconds after the end of first crack (corresponding to a City – Full City roast). I've also tried going lighter, but the very light roasts I've tried (stopping the roast before or during first crack) have been too bready and mild for my taste. The Burundi is definitely my favorite of the four coffees I got from Sweet Maria's. I've discovered that Jones Coffee Roasters (Pasadena) and Klatch Coffee (Upland) also sell green coffee by the pound. I'm excited to get more!
Update: Jones Coffee Roasters no longer sells green coffee. Ordered 5 lbs wet processed Guatemala, 5 lbs wet processed Ethiopia from Sweet Maria's.
Wednesday, September 12, 2012
Roasting Coffee
Now that I don't get free coffee every week, coffee beans have become a significant expense. Coffee at Intelligentsia, which is the nearest obsessive coffee shop to my apartment, often runs upwards of $20 per 12 ounce bag. Very high-quality green coffee from Sweet Maria's (a home roasting supply shop in Oakland) averages around $5 – $7 per pound. So home roasting makes economic sense. More importantly, home roasted coffee is the freshest of all coffee. I plan on roasting at least twice a week. Right now I'm roasting every day.
Of course, saving $15 a week isn't a big deal if you're going to spend $1000 on a coffee roaster. Fortunately, there are some makeshift alternatives that yield quite good results. In the past I've done some stovetop roasting, using a saucepan with a lid and an oven thermometer. Stovetop roasting approximates a drum-roasting environment (most commercial roasters are heated rotating drums), with roast times between 12 and 25 minutes. There are a few drawbacks to stovetop roasting, however. Even with a clear lid, it is very difficult to judge the beans' color, because the lid quickly fogs up. It's also difficult to achieve an even roast, though I've gotten pretty close by careful shaking of the pan. I'm sure my use of a heavy bottomed saucepan (clad copper or aluminum) helps with even heat distribution.
Another device that home roasters have discovered to work very well for roasting coffee is the electric popcorn popper. These devices shoot hot air through the popcorn (or coffee), both heating and circulating simultaneously. Air roasters roast much more quickly, in the range of 4 – 10 minutes. A faster roasting time generally means a lighter bodied, livelier coffee, so this method is well-suited to delicate wet-processed coffees and a light to medium roast. However, popcorn poppers have no built-in mechanism for adjusting heat levels, which depend mainly on the voltage of the outlet the popper is plugged into. Some home roasters adjust heat levels by putting on and taking off the lid, while others install heat dimmers and thermocouples. One can only roast 3 – 4 ounces of beans at a time in a popper, and it should not be used for consecutive roasts, lest the fan and heating element give out.

I recently bought a popcorn popper from Sweet Maria's (the West Bend Air Crazy, to be specific), but I plan to continue using both methods, at least until I decide that one is better than the other. Along with the popper, Sweet Maria's sent a sampler of 4 different pounds of green coffee: a dry-processed Brazilian peaberry; a wet-processed Java; a wet-processed Costa Rica; and a wet-processed Burundi. I think the Java and Brazil might benefit from stovetop roasting in order to emphasize their body and sweetness, while I expect the fruity acidity of the Costa Rica and Burindi to shine with an air roast.

There are various levels to which coffee may be roasted. These levels are generally determined by color, taste, and sound. At 400˚F the beans emit a loud popping noise, known as first crack. Stopping the roast immediately after first crack finishes results in a City Roast. Roasting further will result in (sequentially) City+, Full City, and Full City+. At 440˚F, the beans emit a snapping sound, known as second crack. Roasting into second crack will result in a dark roast. If one stops roasting during the second crack, the result is a Vienna Roast, which is a popular roasting level for espresso (it's also the level to which Peet's roasts most of its beans). Roasting further results in a French or Italian Roast, terms which are used inconsistently with respect to each other but always refer to a very dark roast. At this point, most of the flavor of the beans will be eclipsed by the flavor of the roast, though some coffees, such as wet-hulled Indonesians, are so pungent that the bean flavor is very evident even in a dark roast. As well as contributing flavor, higher levels of roasting increase body (at least up to a Full City Roast) and lower the perception of acidity (AKA 'brightness'; 'liveliness').

Of course, saving $15 a week isn't a big deal if you're going to spend $1000 on a coffee roaster. Fortunately, there are some makeshift alternatives that yield quite good results. In the past I've done some stovetop roasting, using a saucepan with a lid and an oven thermometer. Stovetop roasting approximates a drum-roasting environment (most commercial roasters are heated rotating drums), with roast times between 12 and 25 minutes. There are a few drawbacks to stovetop roasting, however. Even with a clear lid, it is very difficult to judge the beans' color, because the lid quickly fogs up. It's also difficult to achieve an even roast, though I've gotten pretty close by careful shaking of the pan. I'm sure my use of a heavy bottomed saucepan (clad copper or aluminum) helps with even heat distribution.
Another device that home roasters have discovered to work very well for roasting coffee is the electric popcorn popper. These devices shoot hot air through the popcorn (or coffee), both heating and circulating simultaneously. Air roasters roast much more quickly, in the range of 4 – 10 minutes. A faster roasting time generally means a lighter bodied, livelier coffee, so this method is well-suited to delicate wet-processed coffees and a light to medium roast. However, popcorn poppers have no built-in mechanism for adjusting heat levels, which depend mainly on the voltage of the outlet the popper is plugged into. Some home roasters adjust heat levels by putting on and taking off the lid, while others install heat dimmers and thermocouples. One can only roast 3 – 4 ounces of beans at a time in a popper, and it should not be used for consecutive roasts, lest the fan and heating element give out.


There are various levels to which coffee may be roasted. These levels are generally determined by color, taste, and sound. At 400˚F the beans emit a loud popping noise, known as first crack. Stopping the roast immediately after first crack finishes results in a City Roast. Roasting further will result in (sequentially) City+, Full City, and Full City+. At 440˚F, the beans emit a snapping sound, known as second crack. Roasting into second crack will result in a dark roast. If one stops roasting during the second crack, the result is a Vienna Roast, which is a popular roasting level for espresso (it's also the level to which Peet's roasts most of its beans). Roasting further results in a French or Italian Roast, terms which are used inconsistently with respect to each other but always refer to a very dark roast. At this point, most of the flavor of the beans will be eclipsed by the flavor of the roast, though some coffees, such as wet-hulled Indonesians, are so pungent that the bean flavor is very evident even in a dark roast. As well as contributing flavor, higher levels of roasting increase body (at least up to a Full City Roast) and lower the perception of acidity (AKA 'brightness'; 'liveliness').

My first two roasts with the popper. Left: Costa Rica (City Roast); Right: Java (City+)
Tuesday, August 21, 2012
Iced Tea
Fortunately, iced tea is nowhere near as challenging to make as iced coffee. One of the main reasons that my interest in coffee has waxed and my interest in tea has waned is that tea is really quite simple to make. Tea need not—should not—be ground before brewing, as coffee must. Eliminating the grinding step greatly simplifies matters, given how crucial controlling the coarseness of the grind is to brewing coffee.
The second reason that tea is easy to make is that tea seems to be relatively insensitive to extraction (see previous post for info on coffee extraction). Strength is still important, since overly strong tea is unpleasantly tannic, and weak tea is, well, weak. But brewing tea to the same strength with a longer steep time and less tea vs. using more tea and a shorter steep time yields fairly similar results (up to a point). If you tried the same thing with coffee you'd see dramatic differences, due to the differing percentages of the coffee solids that would be extracted. Tea's insensitivity to under- and over-extraction also explains why one can steep tea leaves multiple times, whereas brewing with used coffee grounds... not so tasty.
Since under-extraction is not a big concern, brewing hot tea at double strength and pouring it over ice immediately after steeping yields good results. Brewing tea (regular strength) at room temperature for 8–16 hours also works, provided you protect the tea from oxygen; mason jars work well for this purpose. Hot-brewed and cold-brewed iced teas have different flavor profiles, but they're both agreeable to my palate. I've found cold-brewed tea to be a bit clearer in appearance, but your mileage may vary. One advantage of hot-brewed iced tea is that it can be a more efficient use of tea, if you incorporate a second steep using a longer steep time and adding less ice.
More important than brewing method is the kind of tea used. Some teas make really terrible iced tea. My current favorite iced tea is a blend of two parts Ceylon to one part Keemun. The brisk citrus flavor of Ceylon makes a fantastic base, and the intense floral/incense notes of the Keemun add sweetness and complexity.
Finally, there's the question of sugar and lemon. I prefer unsweetened tea, but sweetened iced tea has a long tradition. I've always been tempted to sweeten tea with honey, since it tastes nice and is (maybe) healthier than sugar. After a few experiments, though, I can't recommend it, unless you really like the taste of honey. The problem is that honey has such a strong flavor that it tends to overpower the flavors of the tea itself. So stick with plain old refined white sugar or nothing at all, unless you're making chai.
I sometimes like lemon in iced tea, because the acidity adds a refreshing brightness and complements the citrus flavors of Ceylon tea. But lemon can easily overpower the tea's flavor, so I usually add only a very small amount—maybe 1/16th of the juice of a lemon. I recently had an unusual idea that I think is worth trying, which is to bypass the lemon and add acid directly to the tea. Homebrew shops sell acid blends for winemakers to use to add acidity to their wines. These blends contain several naturally occurring acids, namely malic, citric, and tartaric acids. Malic acid is found in high concentrations in apples, and citric acid is highly concentrated in (surprise!) citrus fruits. Tartaric acid is a bit less familiar, but wine grapes contain a balance of all three acids. My goal in using an acid blend would be to add acidity to the iced tea without the strong aromatic flavors that lemon also contributes.
Tuesday, August 14, 2012
Iced Coffee, Part 1: Hypotheses
In preparation for further brewing of coffee stouts, I've decided to again try to master iced coffee. In this post, I will summarize the hypotheses I've come up with to explain my previous experiences with making iced coffee, and lay out future plans for testing these hypotheses.
The challenges of iced coffee emerge chiefly from two sources: oxidation and under-extraction. Oxidation results in the acrid taste of stale coffee, and is a function of oxygen exposure, time, and temperature. Oxidation is a concern for cold-brewed coffee because of the long brewing times necessary to achieve proper levels of extraction. Oxidation is also a concern for hot-brewed iced coffee if it isn't chilled immediately, because oxidation occurs much more rapidly at high temperatures. Oxidation is especially worrying for me, because the effects of oxidation increase over time, and I want my coffee stouts to last much longer than iced coffee is expected to.
Extraction refers to the percentage of solids dissolved into the water during brewing. One intuitive way to think about extraction is as brewing efficiency—but higher efficiency is not always better. According to the SCAA, ideal extraction is about 20% (interestingly, this is true for both brewed coffee and espresso). Coffee with much less than 20% extraction is said to be under-extracted; coffee with much more than 20% extraction is said to be over-extracted, which is even worse.
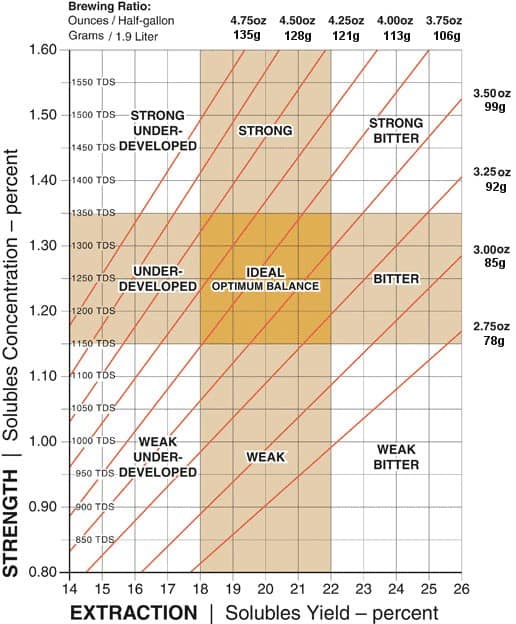
Extraction is a function of a number of variables, including: brew ratio (coffee-to-water ratio), grind, water temperature, brew time, and agitation. Crucially, brew strength is distinct from amount of extraction: strength equals brew ratio multiplied by amount of extraction. Therefore, if a high enough brew ratio is used, it is quite easy to make very strong but under-extracted coffee, as in the top left corner of this chart:
Under-extraction in brewed coffee often yields a musty or tea-like aroma that I find particularly unpleasant at cold temperatures.
One method of brewing iced coffee that has become popular recently—sometimes under the moniker 'Japanese iced coffee'—is to brew hot coffee directly onto ice, compensating for the dilution the ice produces by using half the usual amount of brewing water. I've tried this method many times over the past few months, using both Hario V60 brewers and press pots, with consistently disappointing results. Specifically, every attempt yielded coffee with the musty aroma that I now (tentatively) identify as under-extraction. Varying the amount of coffee I used didn't seem to help.
So why did the brew-onto-ice method fail? The problem, I think, is this: by reducing the amount of brewing water so dramatically, the percentage of solids extracted from the coffee grounds dropped precipitously. Less hot water passing through the coffee, less solids extracted from the coffee.
There is, therefore, a trade-off inherent in the brew-onto-ice method. Keeping the total coffee-to-water ratio constant, one can vary the ratio of hot water to ice. (Note that ice should always be measured in weight, since the amount of ice in a given volume will vary depending on the size of the ice cubes.) Adding more hot water and less ice will result in better extraction, but also slower chilling of the coffee, possibly leading to oxidation. Adding more ice and less hot water will result in faster chilling, and hence less risk of oxidation, but also lower extraction. I believe that there is a ratio (or range of ratios) at which neither under-extraction nor oxidation are major concerns, but I have yet to determine where this sweet spot lies.
One strategy to compensate for the decrease in extraction caused by the reduction in hot water is to use a finer grind. This is a technique already in use by my former employer, but until now I did not fully understand the reasoning behind it. Using a finer grind increases the strength of the coffee by raising extraction, while reducing the amount of water (or increasing the amount of coffee) increases the strength of the coffee but decreases extraction. In order to maintain optimal extraction, therefore, an increase in the brew ratio should always be accompanied by a finer grind and/or an increase in brewing time. (In drip methods of brewing, a finer grind also increases the brewing time.) This is a bit counter-intuitive, but I'm pretty sure it's true!
In order to test these ideas and try to make better iced coffee (and hence better coffee stouts) I plan to brew iced coffee using several different methods.
1. Traditional cold-brew. 80 grams of coffee per liter of room temperature water. Medium grind. 18 hour brew time (room temperature).
2. Barismo-style cold-brew. 80 grams of coffee per liter of 40˚F water. Medium grind. 18 hour brew time (refrigerated).
3. Hario V60 brew-onto-ice. 50 grams of coffee per liter of total water. (Variable hot water/ice ratio). Medium-fine/fine grind.
4. Full-immersion hot brew poured onto ice. 50 grams of coffee per liter of total water. (Variable hot water/ice ratio). Medium-fine grind (or medium-fine/fine grind for a direct comparison with method 3).
In order to filter the cold-brewed and full-immersion coffee I will probably just use the Hario. Any oxygen introduced shouldn't affect the flavor in the short-term. In any case, I will taste the coffee before and after filtration. In the long run I would like to find a way to filter without exposure to air, and without having to use a coarse grind (as a press would require). Hario makes an iced coffee maker called the Mizudashi that might work. The Eva Cafe Solo is also an option. Or a cotton sack, perhaps.
Results to come.
The challenges of iced coffee emerge chiefly from two sources: oxidation and under-extraction. Oxidation results in the acrid taste of stale coffee, and is a function of oxygen exposure, time, and temperature. Oxidation is a concern for cold-brewed coffee because of the long brewing times necessary to achieve proper levels of extraction. Oxidation is also a concern for hot-brewed iced coffee if it isn't chilled immediately, because oxidation occurs much more rapidly at high temperatures. Oxidation is especially worrying for me, because the effects of oxidation increase over time, and I want my coffee stouts to last much longer than iced coffee is expected to.
Extraction refers to the percentage of solids dissolved into the water during brewing. One intuitive way to think about extraction is as brewing efficiency—but higher efficiency is not always better. According to the SCAA, ideal extraction is about 20% (interestingly, this is true for both brewed coffee and espresso). Coffee with much less than 20% extraction is said to be under-extracted; coffee with much more than 20% extraction is said to be over-extracted, which is even worse.
Extraction is a function of a number of variables, including: brew ratio (coffee-to-water ratio), grind, water temperature, brew time, and agitation. Crucially, brew strength is distinct from amount of extraction: strength equals brew ratio multiplied by amount of extraction. Therefore, if a high enough brew ratio is used, it is quite easy to make very strong but under-extracted coffee, as in the top left corner of this chart:
Under-extraction in brewed coffee often yields a musty or tea-like aroma that I find particularly unpleasant at cold temperatures.
One method of brewing iced coffee that has become popular recently—sometimes under the moniker 'Japanese iced coffee'—is to brew hot coffee directly onto ice, compensating for the dilution the ice produces by using half the usual amount of brewing water. I've tried this method many times over the past few months, using both Hario V60 brewers and press pots, with consistently disappointing results. Specifically, every attempt yielded coffee with the musty aroma that I now (tentatively) identify as under-extraction. Varying the amount of coffee I used didn't seem to help.
So why did the brew-onto-ice method fail? The problem, I think, is this: by reducing the amount of brewing water so dramatically, the percentage of solids extracted from the coffee grounds dropped precipitously. Less hot water passing through the coffee, less solids extracted from the coffee.
There is, therefore, a trade-off inherent in the brew-onto-ice method. Keeping the total coffee-to-water ratio constant, one can vary the ratio of hot water to ice. (Note that ice should always be measured in weight, since the amount of ice in a given volume will vary depending on the size of the ice cubes.) Adding more hot water and less ice will result in better extraction, but also slower chilling of the coffee, possibly leading to oxidation. Adding more ice and less hot water will result in faster chilling, and hence less risk of oxidation, but also lower extraction. I believe that there is a ratio (or range of ratios) at which neither under-extraction nor oxidation are major concerns, but I have yet to determine where this sweet spot lies.
One strategy to compensate for the decrease in extraction caused by the reduction in hot water is to use a finer grind. This is a technique already in use by my former employer, but until now I did not fully understand the reasoning behind it. Using a finer grind increases the strength of the coffee by raising extraction, while reducing the amount of water (or increasing the amount of coffee) increases the strength of the coffee but decreases extraction. In order to maintain optimal extraction, therefore, an increase in the brew ratio should always be accompanied by a finer grind and/or an increase in brewing time. (In drip methods of brewing, a finer grind also increases the brewing time.) This is a bit counter-intuitive, but I'm pretty sure it's true!
In order to test these ideas and try to make better iced coffee (and hence better coffee stouts) I plan to brew iced coffee using several different methods.
1. Traditional cold-brew. 80 grams of coffee per liter of room temperature water. Medium grind. 18 hour brew time (room temperature).
2. Barismo-style cold-brew. 80 grams of coffee per liter of 40˚F water. Medium grind. 18 hour brew time (refrigerated).
3. Hario V60 brew-onto-ice. 50 grams of coffee per liter of total water. (Variable hot water/ice ratio). Medium-fine/fine grind.
4. Full-immersion hot brew poured onto ice. 50 grams of coffee per liter of total water. (Variable hot water/ice ratio). Medium-fine grind (or medium-fine/fine grind for a direct comparison with method 3).
In order to filter the cold-brewed and full-immersion coffee I will probably just use the Hario. Any oxygen introduced shouldn't affect the flavor in the short-term. In any case, I will taste the coffee before and after filtration. In the long run I would like to find a way to filter without exposure to air, and without having to use a coarse grind (as a press would require). Hario makes an iced coffee maker called the Mizudashi that might work. The Eva Cafe Solo is also an option. Or a cotton sack, perhaps.
Results to come.
Thursday, August 9, 2012
Collected Beer Writings
I've compiled my writings from the Angry Monocle blog, along with four of our best recipes, into a single document: http://www.scribd.com/doc/102419707
Wednesday, August 8, 2012
Los Angeles
New blog! This will be a bit wider in scope than Angry Monocle, covering coffee and tea as well as beer.
Brewing beer in Los Angeles will present a few new problems. Seattle has some of the softest, purest water in America, while LA decidedly does not. For coffee and tea, filtered water should suffice, but I don't think I want to wait for six gallons of water to run through a Brita, so for beer I will either use packaged drinking water, or, more ambitiously, use reverse osmosis water and adjust the water chemistry according to the beer I'm brewing. Stouts, for example, benefit from harder water to balance the acidity of the roasted grains.
Los Angeles is also a bit warmer than Seattle. At the moment, it's 7pm and 84˚F. If I want to brew this summer, I'll either need to invest in a temperature control system or exclusively brew saisons, which like to ferment hot.
Subscribe to:
Posts (Atom)