Last year, I wrote a post detailing my attempts to brew good iced coffee at home. I intended to follow up on it once I'd done some more experiments. Then summer ended and I stopped drinking iced coffee. Pretty much the same thing happened this summer, but I've made some progress. Iced coffee, for me, will never compare to hot coffee, but I've grown to appreciate both cold brew and chilled iced coffee.
For cold brew, I like a ratio of 1 part coffee to 12 parts water (i.e. 83 grams per liter). If you cold brew in the refrigerator, á la Barismo, use a medium (cupping) grind. If you cold brew at room temperature, use a medium-coarse (press) grind. (Room temperature coffee will melt the serving ice quicker, and hence become diluted faster.) Both methods produce good results in 12 - 24 hours.
Filtering cold brew can be challenging, especially if you make a lot of it. The first step is to remove the large particles of coffee with a metal chinois, china cap, or tea strainer. But even extremely fine metal filters will not provide an acceptable level of clarity by themselves. For a polishing filter, there are three options: paper, cloth, or synthetic. Paper filters are easy to find, but clog up very quickly. Organic cotton filters are a better option if you can find them, but they're still fairly slow and require careful cleaning. My preferred filtration medium is food grade monofilament nylon, so long as it's rated 20 microns or smaller.
In Peter Giuliano's influential post on iced coffee from last year (Japanese Iced Coffee), he argues against cold-brewed coffee, on the grounds that it is (allegedly) underextracted, oxidized, and lacking in aromatics. I'll discuss these objections individually, then look at what alternatives to cold brewing exist.
Giuliano claims that low brewing temperatures necessarily result in underextracted coffee. It's true that most cold brew is underextracted, if its extraction yield is calculated according to the traditional formula (Extraction[%] = BrewedCoffee[g] * TDS[%] / CoffeeGrounds[g]). But this is only true because cold brew is usually made as a full immersion brew. As Vince Fedele has argued, calculating extraction yield for immersion brewing requires a different calculation (Extraction[%] = TotalWater[g] * TDS[%] / CoffeeGrounds[g]). Making this adjustment puts cold brew back in the proper range of extraction, if performed properly.
Giuliano also claims that long brewing times result in oxidized (i.e., stale) coffee. In my experience, cold brew does certainly become oxidized, but not nearly as quickly as hot brewed coffee, because oxidation occurs more slowly at lower temperatures. Still, I prefer to drink cold brew within 12-24 hours of brewing. Even with refrigeration and nitrogen flushing, more than a couple of days is pushing it. Of course, many people enjoy the woody flavors that result from oxidized cold brew. (The entire success of coffee stouts is built on this fact.)
Giuliano's preferred iced coffee brewing method, which he calls the "Japanese iced coffee method", involves brewing hot coffee via pour-over directly onto ice. I've tried this technique dozens and dozens of times over the past couple of years. I've tried varying grind, dose, ice/water ratio, and water temperature. I've tried both V60s and Chemex, as well as immersion brews poured through a paper filter. Every single time, I get a unpleasant musty aroma.
Now that I'm using an espresso machine again, I've noticed a very similar aroma when making espresso over ice. I think, therefore, the most likely source of the unpleasant aroma is temperature shock. I've been reluctant to believe that temperature shock really exists, because no one I know of has given it an adequate scientific explanation. But I've found that by allowing the coffee to cool somewhat before adding ice, the unpleasant aroma can be minimized.
Upon re-reading Giuliano's post, I was struck by this passage on volatility:
"Cooling the coffee quickly, though, reduces volatility dramatically. This effectively locks the ephemeral volatiles (like floral and fruit notes) into solution until the coffee is warmed again. This happens on the coffee’s way down your throat (sorry to get graphic here), which sends a punch of beautiful volatile aromatics through your retronasal cavity to your olfactory receptors. And that explains the olfactory-flavor punch of brewed-hot-quickly-cooled Japanese-style iced coffee."
Is it possible that the aromas that I perceived as unpleasant and musty are the same that Giuliano describes as 'floral and fruit notes'? My, how tastes vary! What it comes down to, I think, is this: Cooling coffee very rapidly results in a distinctive aromatic profile not found in cold brewed or slow chilled coffee. The degree to which this aromatic profile is desirable depends on both the coffee and consumer.
Since I have not yet found a coffee that I enjoy brewed directly over ice, I prefer to slow down the chilling process somewhat. My basic method is this: brew coffee at a 1:10 ratio (100 g/l). After brewing, cover and allow the coffee to cool slowly, until it's below 150˚F (66˚C). Then add ice and stir until the coffee is under 50˚F (10˚C). Strain the coffee over fresh ice and serve. The whole cooling process should take 5 - 10 minutes. For large batches, an ice bath may be necessary to hit this time frame.
There are two standard objections to this technique. The first objection is that the increased coffee/water ratio will decrease extraction yield, making the resulting coffee underextracted. The premise of the argument is true, however, this effect can be compensated for by using a slightly finer grind, as in bypass brewing, and/or by adding water at a slower rate.
The second, more serious, objection is that allowing the coffee to cool slowly allows an unacceptable amount of oxidation to occur. Oxidation is largely responsible for the staling of brewed coffee, and oxidation occurs much more rapidly at high temperatures. Therefore, the slow cooling to 150˚F involved in the above method means that more oxidation occurs than if the coffee were chilled immediately.
My response: When I brew hot coffee, I don't drink it when it's over 150˚F, because at that temperature it's impossible to taste all its subtleties. (Also, I don't like to burn my tongue.) I (gasp!) let it sit for a few minutes before tasting. If the above objection were valid, it would imply that all the hot coffee I'm drinking is stale. But the fact is, even at high temperatures it takes a little while for oxidation to reach a noticeable level—at least 20 minutes. Therefore, there's no reason to believe that allowing coffee to cool somewhat before adding ice will make it noticeably oxidized, provided the coffee is served soon after chilling.
Other iced coffee resources (not all of which I agree with):
http://coffeegeek.com/opinions/coffeeatthemoment/09-10-2011
http://beansandwater.tumblr.com/post/22588752858/iced-coffee
http://blog.barismo.com/2011/08/iced-coffee.html

Showing posts with label coffee. Show all posts
Showing posts with label coffee. Show all posts
Friday, October 4, 2013
Tuesday, April 23, 2013
Cafe au Lait at Home
While I love espresso machines with all my heart, I doubt I will ever have one in my home. Money, of course, is one obstacle. A good commercial machine like a La Marzocco Linea runs about $5k used. While there are a multitude of models of home espresso machines, most all of them have quirks of one sort or another. Even if they can reach nine bars of pressure, most home machines have issues with temperature stability—issues that commercial machines largely avoid due to their greater mass. And that's not even mentioning the grinder, which in many respects is more important than the espresso machine itself.
Cost aside, making espresso inherently involves a certain amount of waste. It takes at least a couple of shots to dial in the grind on a coffee, and dialing-in has to be performed daily (if not more often) as well as whenever switching coffees. In a commercial context, a few wasted shots a day is not a big deal, but for a home enthusiast who's only drinking a couple of shots a day, dialing-in could mean that 50% of the shots pulled are test shots.
For these reasons, I mostly drink brewed coffee at home. I've used the Hario V60 cone more than any other device, although I also have a Kalita Wave and an Aeropress. However, a lot of people really like steamed milk, and it's nice to be able to offer guests that option. So I recently acquired a Bellman stovetop steamer, with the intention of using it exclusively for hot chocolates and chai lattes. But, curiosity getting the better of me, I've started using it for coffee drinks as well. Since I don't have an espresso machine, I can't make lattes or cappuccinos, but I can make cafe au laits with very strong coffee from an Aeropress. There are, however, limits to this technique.
The biggest difference between an Aeropress and an espresso machine (there are, of course, many differences) is that the Aeropress is an immersion brewing device, while espresso is a percolation brewing method. What that means is, the Aeropress incorporates a steep time during which most of the extraction occurs, while an espresso machine is continually pumping in fresh water for the entire extraction.
As Vince Fedele recently confirmed (see the fourth-to-last paragraph of this post for more details), immersion methods of brewing coffee require a greater amount of coffee to reach the same level of extraction. This effect is exaggerated at very high doses. Therefore, in order to make coffee by Aeropress at a similar strength and level of extraction as espresso, you have to use a lot more coffee.
Option One: Whole Hog
So what happens if we try to mimic a good shot of espresso with an Aeropress? For this trial, we'll choose to model a moderate ristretto shot. We'll aim for a liquid yield of 40 grams and an extraction of 19%. Let's figure out how much coffee and water I should use.
For immersion brewing, the equation to calculate extraction is:
Extraction[%] = Water[g] * Strength[%] / Coffee[g]
This method makes a nice small (4-5 oz) milk drink.
Thanks to NetPhilosopher on coffeegeek.com, on whose work I based this post.
Cost aside, making espresso inherently involves a certain amount of waste. It takes at least a couple of shots to dial in the grind on a coffee, and dialing-in has to be performed daily (if not more often) as well as whenever switching coffees. In a commercial context, a few wasted shots a day is not a big deal, but for a home enthusiast who's only drinking a couple of shots a day, dialing-in could mean that 50% of the shots pulled are test shots.
For these reasons, I mostly drink brewed coffee at home. I've used the Hario V60 cone more than any other device, although I also have a Kalita Wave and an Aeropress. However, a lot of people really like steamed milk, and it's nice to be able to offer guests that option. So I recently acquired a Bellman stovetop steamer, with the intention of using it exclusively for hot chocolates and chai lattes. But, curiosity getting the better of me, I've started using it for coffee drinks as well. Since I don't have an espresso machine, I can't make lattes or cappuccinos, but I can make cafe au laits with very strong coffee from an Aeropress. There are, however, limits to this technique.
The biggest difference between an Aeropress and an espresso machine (there are, of course, many differences) is that the Aeropress is an immersion brewing device, while espresso is a percolation brewing method. What that means is, the Aeropress incorporates a steep time during which most of the extraction occurs, while an espresso machine is continually pumping in fresh water for the entire extraction.
As Vince Fedele recently confirmed (see the fourth-to-last paragraph of this post for more details), immersion methods of brewing coffee require a greater amount of coffee to reach the same level of extraction. This effect is exaggerated at very high doses. Therefore, in order to make coffee by Aeropress at a similar strength and level of extraction as espresso, you have to use a lot more coffee.
Option One: Whole Hog
So what happens if we try to mimic a good shot of espresso with an Aeropress? For this trial, we'll choose to model a moderate ristretto shot. We'll aim for a liquid yield of 40 grams and an extraction of 19%. Let's figure out how much coffee and water I should use.
For immersion brewing, the equation to calculate extraction is:
Extraction[%] = Water[g] * Strength[%] / Coffee[g]
Since the Aeropress retains 1.5 grams of liquid per gram of coffee, we can calculate yield as:
Yield[g] = Water[g] - (1.5 * Coffee[g])
Espresso can range in strength from 5% to 15%, depending on how the shot is pulled. Let's shoot for 10%, which is about average for many specialty coffee shops. (That's about what a 20g dose for a 40g yield comes out to at 19% extraction.) If you work through the equations, what quickly becomes apparent is that achieving coffee at 10% strength by immersion is hugely wasteful. Sure, you can keep adding more coffee, but your yield will keep decreasing, and if you add more water to increase yield you also have to add more coffee to maintain 10% strength.
What that means is, at 10% strength, for every 100g of water you add, you'll only get 20g of liquid, because the amount of coffee you have to add (53 grams, in this case) retains so much. And with infusion methods, all of that retained liquid is extracted coffee. So if you wanted to produce 40 grams of liquid at 10% strength in an Aeropress, you would have to use 106 grams of coffee! (If anyone wants to check my math, shoot me an email.) And I don't think that you can fit that much coffee and water in an Aeropress. So, if we're defining espresso as coffee at a similar strength and volume as what is typical for specialty coffee, then it is impossible to make espresso in an Aeropress.
What that means is, at 10% strength, for every 100g of water you add, you'll only get 20g of liquid, because the amount of coffee you have to add (53 grams, in this case) retains so much. And with infusion methods, all of that retained liquid is extracted coffee. So if you wanted to produce 40 grams of liquid at 10% strength in an Aeropress, you would have to use 106 grams of coffee! (If anyone wants to check my math, shoot me an email.) And I don't think that you can fit that much coffee and water in an Aeropress. So, if we're defining espresso as coffee at a similar strength and volume as what is typical for specialty coffee, then it is impossible to make espresso in an Aeropress.
Option Two: Half Hog
So let's lower our sights a little. How about if we aim for 5% strength? Now we're only losing 39% of our liquid in the grounds. So we only have to add 65 grams of water and 17 grams of coffee to get our 40 grams of liquid. But we'll also need to increase our liquid yield in order to (partially) compensate for our loss of strength. So let's scale the recipe up to produce 60 grams of liquid, using 25.5 grams of coffee.
Now that we have our brew ratio sorted out, we can move on to the actual brewing process. In order to get a proper extraction, a very fine grind should be used. I generally stick with 200F water for everything, so that's what I used for this method. I brew the Aeropress inverted, aiming for a total brew time of 2 minutes, including pouring and pressing. Pressing should be done slowly to avoid channeling.
To be clear, this is not true espresso. It is very strong brewed coffee. It lacks the sweetness and body of a good shot of espresso, but is superior to anything I've had out of a superautomatic machine.
Milk Steaming
The Bellman steamer is not an ideal steaming device, mainly because it has a single-hole tip and limited steam pressure. It's also more difficult to clean than commercial steamers because the tip isn't removable. However, with some practice I've been able to make latte art quality microfoam fairly consistently. Some general tips for using this steamer:
-Preboil the water in an electric kettle. It's much faster than waiting for the water to heat up on the stove.
-Only fill the steamer halfway.
-Wait for the safety release valve on the steamer to start whistling before you try to steam anything.
-Keep the steamer on medium-high heat while steaming.
-Use a 12 oz pitcher.
-The Bellman takes much longer to heat up milk than a commercial steam wand, though foaming may occur rapidly. For this reason, it's easy to overaerate your milk. If you do overaerate, scoop off excess foam.
This method makes a nice small (4-5 oz) milk drink.
Thanks to NetPhilosopher on coffeegeek.com, on whose work I based this post.
Friday, February 22, 2013
Coffee Is Not Acidic
Well, not very acidic, as far as beverages go. One of the major misconceptions about coffee is (1) that it is particularly acidic, and (2) that this acidity causes abdominal pain. As a result of these misconceptions, a cottage industry has developed around 'low-acid' coffee. Here are the facts.
The average pH of black coffee is about 5. That's the same pH as black tea. Herbal teas containing ingredients like rose hips or hibiscus can be considerably more acidic. Even beer, which is not usually thought of as an acidic beverage, has a typical pH of around 4. Most wine and fruit juice is between 3 and 4, and many sodas, due to liberal additions of phosphoric acid, are even lower—Coke is 2.5! Since pH is a logarithmic scale, a substance that is one point lower in pH actually has ten times the concentration of free hydrogen ions. So beer is actually ten times as acidic as coffee.
If coffee causes you stomach problems, don't blame the acidity—unless you also have problems with tea, beer, and fruit. Which is not to say that coffee never causes abdominal pain, just that acids are not the usual culprit. Caffeine alone often triggers abdominal pain, and it's quite possible that there are other aggravating compounds in coffee.
If you prefer the taste of low-acid coffee, fine, but don't avoid acidic-tasting coffee for medical reasons. You're cutting yourself off from a world of beautiful, complex coffees that feature fruity and floral flavors you will never taste in low-acid coffee.
Saturday, January 26, 2013
Dialing In Your Coffee Grinder
Brewing coffee presents a unique problem. It is extremely sensitive to a variable that most people have no way of measuring: extraction yield. Tea, by contrast, is tasty across a wide range of extractions, as evidenced by the fact that multiple steepings of the same tea leaves can produce delicious results. Bitter tea is over-strong, not overextracted.
So when you brew coffee, you're aiming at a very small target (18% - 22% extraction) which you have no way of measuring. To hit that target, most people rely on recipes handed down by a trusted source. But the problem with just following a recipe is that even if you can control water temperature, coffee dose, and brewing time, there's no way for a recipe to specify exactly how fine your grind should be. Typically, the recipe will specify, say, 'medium-fine' or 'the consistency of table salt', but this is far too inexact. Even a small difference in grind size can have a major impact on extraction yield. Furthermore, no grinder produces a perfectly even grind; every grinder produces a slightly different grind profile. What that means is that even if the average grind size is identical, the grounds produced by two different grinders will extract slightly differently.
Now, I do think recipes are a useful starting place, but everyone needs to dial the recipe in on their own grinder. The only way to do this, short of a coffee refractometer, is to rely on taste. So you should be able to taste underextraction and overextraction, and know how to correct for both. All this assumes that you're starting with good, fresh coffee, good water, and clean equipment.
1. Overextraction. This is relatively easy to taste. Overextracted coffee is harshly bitter, often astringent or solvent-like. If you want to know what overextraction tastes like, try boiling your coffee. Often times overextracted coffee will taste as if it is roasted darker than it actually is, because the bitter compounds that are extracted last are mostly dry distillates—burnt sugars and heavy maillard compounds—which are more concentrated in darker roasts. If your coffee tastes overextracted, use a coarser grind.
2. Underextraction. This is a bit more subtle. Underextracted coffee generally lacks sweetness and complexity, and sometimes has a tea-like flavor. Underextracted coffee is often described as being overly acidic or sour; this is not strictly true. Think about it: why would a cup with less extraction have more acid? However, it is true that acids extract more quickly than most compounds in coffee, so an underextracted cup may have a higher proportion of acids, which might lead to higher perceived acidity. If your coffee tastes underextracted, use a finer grind.
In order to dial-in your brewing technique, you need to make sure that you have control of all variables. That means weighing your coffee. Measuring by volume will make it much more difficult to dial-in your grind. Start with a middle-of-the-road dosage, say, 60 grams of coffee per liter of water (14g per 8 oz). If you're brewing manually (pour over, French press, Aeropress), you need to measure water temperature and brewing time. 200˚F is a good place to start for water temperature, but more importantly, be consistent with temperature and brew time.
Brew, taste, adjust grind if necessary, repeat. Take notes. Since overextraction is easier to taste, it can be a useful exercise to push the grind finer and finer until you taste overextraction, and then back off a bit. There are a lot of variables that affect coffee extraction, but most of the time you can get a decent cup just by manipulating the grind. In general, people worry far too much about the brewing device, and far too little about the grinder. Yes, you need an adjustable burr grinder, but once you have one, you can brew very good coffee even in a cheap automatic coffee maker—or a clean cotton sock—provided you know how to dial in your grind.
Thursday, December 27, 2012
Coffee Varieties
Within the species coffea arabica, which produces the vast majority of high quality coffee, there are a large number of varieties. As consumers have become more interested in the nuances of coffee flavor, more attention has been given to the effects of plant variety. Here are some of the major coffee varieties, which you might see listed on your bag of coffee.
Typica - Historically the most commonly grown coffee variety, Typica is the coffee against which all other varieties are judged. The ancestors of modern Typica originated in Yemen, but in the 17th and 18th centuries were taken through India to Java, then sequentially to Amsterdam, Paris, and Martinique, before being exported to Latin America, Brazil, and Africa. Now grown worldwide.
Bourbon - In the 18th century, a mutation of Typica was found growing on the island of Bourbon (now known as Reunión, located off the coast of Madagascar) which was higher-yielding and more disease-resistant than Typica. Bourbon is also known for its sweetness and citrus-like acidity. Now grown mainly in Central America, especially in Guatemala and El Salvador.
SL28 & SL34 - Bourbon plants were also exported to Tanzania, then Kenya by French missionaries. Of these French Mission Bourbon varieties, two were selected by a coffee research institute, Scott Labs, as being of particularly high quality and suited to the dry Kenyan climate. SL28 & 34 produce a full-bodied cup with good acidity, often with notes of blackberry and blackcurrant. Kenya grows the vast majority of this prized coffee.
Caturra - A mutation of Bourbon discovered in Brazil in 1935, which was higher-yielding still. Very common throughout Latin America. Caturra can produce high-quality coffee, but even experienced coffee tasters probably wouldn't be able to distinguish a Caturra from a Typica in a blind tasting.
Catuai - A hybrid of Caturra and Mundo Novo (which is itself a natural hybrid of Bourbon and Typica). Catuai is high-yielding, and can produce good coffee, but, like Caturra, is not particularly distinctive. Grown in Brazil and Latin America.
Pacamara - A hybrid of Pacas, a descendent of Bourbon, and Red Maragogipe, a mutation of Typica. Developed in El Salvador in 1958, and still mainly grown there. Pacamara plants produce extremely large beans and often display a jasmine aroma.
Ethiopian heirloom varieties - Ethiopia is the birthplace of coffee, and most Ethiopian coffee is produced from native plants. The genetic diversity of Ethiopian coffee plants is far greater than the diversity of cultivated varieties, and Ethiopian coffee can display a huge range of flavors.
Gesha - A wild Ethiopian variety of coffee which was exported to Panama in the 1960s for its disease-resistance, but was found to be relatively low-yielding and therefore was not widely planted. In 2004, the variety was rediscovered when La Esmerelda, a farm in Panama, won the national Cup of Excellence competition with their Gesha coffee. Since then, it has become specialty coffee's most sought after coffee, at one point selling for $170 a pound—unroasted! Gesha is known for its intense floral aromatics, reminiscent of its Ethiopian heritage.
Sources:
http://www.atlascoffee.com/pacamara.pdf
http://wetmill.tumblr.com/page/2
http://www.coffeereview.com/article.cfm?ID=161
http://www.terroircoffee.com/content/view/260/
Saturday, December 1, 2012
Coffee Extraction
Coffee brewing advice is often hard to trust, due to much of the industry's lack of scientific knowledge, and the fact that most of the people giving the advice are trying to sell some fancy new brewing device. For exactly this reason, the most important coffee-related invention of the past few decades isn't a coffee brewer, grinder, or filter. It's a refractometer.
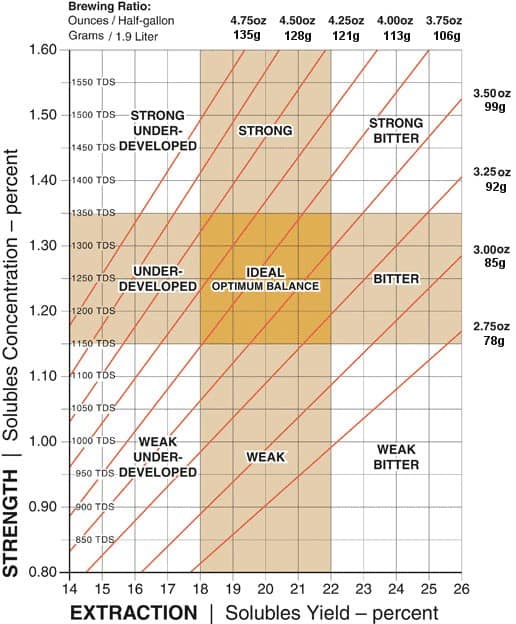
Both of these extremes are undesirable. While consumer preferences regarding coffee strength vary significantly, preferences regarding level of extraction are remarkably consistent. Coffee strength is expressed as the percentage of the brewed coffee that consists of dissolved coffee solids (% TDS). The Specialty Coffee Association of America recommends that brewed coffee consist of 1.15% - 1.35% TDS, while the Specialty Coffee Association of Europe recommends 1.2% - 1.5% TDS. These numbers are flexible; a ristretto shot of espresso can be upwards of 10% TDS and delicious.
Extraction yield is far less flexible. Extraction is expressed as the percentage of the ground coffee that is dissolved into the brewed coffee. The SCAA and SCAE recommend 18% - 22% extraction for both brewed coffee and espresso. This means that about one-fifth of the coffee in your brewer should end up in your cup, regardless of how strong you like your coffee.
Refractometers, as the name suggests, measure the refractive index of a material (i.e., the amount that light bends when passing through said material). If that material is a liquid, a refractometer can be used to measure how much stuff is dissolved in the liquid—the total dissolved solids (TDS)—by measuring the difference between the refractive index of the solvent (e.g., water) and the solution (e.g., brewed coffee). Of course, refractometers have been around since the 19th century, but it wasn't until 2008, when VST Technologies released a refractometer specifically designed for coffee, that specialty coffee shops started using them to measure coffee strength and extraction yields. (I'm sure the fact that VST released an iPhone app to go with the refractometer helped to encourage adoption.)
So why is this important? Don't we already know how to make coffee stronger or weaker? Just use more or less coffee! Well, yes, but there is a crucial distinction between strength and extraction. One might take a very small amount of coffee and boil it for an hour, or take a large amount of coffee and steep it in cold water for a few seconds. The resulting solutions might be the same strength, but would have very different levels of extraction. The boiled coffee would contain nearly all the soluble solids from the coffee grounds, while the coffee steeped for a few seconds would contain only a small fraction of those soluble solids.
Extraction yield is far less flexible. Extraction is expressed as the percentage of the ground coffee that is dissolved into the brewed coffee. The SCAA and SCAE recommend 18% - 22% extraction for both brewed coffee and espresso. This means that about one-fifth of the coffee in your brewer should end up in your cup, regardless of how strong you like your coffee.
Where did these numbers come from? The Coffee Brewing Institute (long since defunct) first studied consumer preferences for extraction levels in the 1950s, and their research has since been replicated by multiple organizations in several countries. The CBI originally came up with 17.5% - 21.2%, but more recent studies have settled on 18% - 22%. More information on these studies can be found in a post by Vince Fedele, head of VST. The point is, this number is based on empirical evidence regarding the preferences of the general public.
Overextraction results in intensely bitter coffee, while underextracted coffee is usually sour and lacking in complexity. The distinction between sourness and acidity is, as far as I can tell, unique to coffee. Acidity is generally a desirable characteristic in coffee; sourness refers to an acidic coffee that lacks the sweetness to balance its acidity. Since the caramelized sugars that give coffee its sweetness are less soluble than acids (the main acids in coffee are citric and malic), underextracted coffee is often sour in this sense.
Overextraction results in intensely bitter coffee, while underextracted coffee is usually sour and lacking in complexity. The distinction between sourness and acidity is, as far as I can tell, unique to coffee. Acidity is generally a desirable characteristic in coffee; sourness refers to an acidic coffee that lacks the sweetness to balance its acidity. Since the caramelized sugars that give coffee its sweetness are less soluble than acids (the main acids in coffee are citric and malic), underextracted coffee is often sour in this sense.
The ultimate goal of any coffee brewer, therefore, is to achieve extraction yields of 18% - 22%. Extraction yield is affected by a number of variables, including: water temperature, grind size, brew time, agitation, coffee/water ratio, water profile, and coffee density and roast level. The problem is that the only way to measure extraction directly is to dry the spent grounds in an oven and weigh them, a process that takes hours and careful attention to detail. Because of the difficulty of measuring extraction, for decades the only people doing so were at large research institutes. However, if one could accurately measure the strength of the brewed coffee and the mass of the ground coffee and brew water, it would be possible to calculate extraction yield by the following formula: Extraction[%] = BrewedCoffee[g] * TDS[%] / CoffeeGrounds[g]. The mass of coffee grounds and brewed coffee can be easily measured with a scale, but measuring TDS is more difficult.
An affordable option is to buy a cheap TDS meter, such as those used to measure water quality. I bought one of these, but found that my readings varied wildly. The refinement provided by VST's coffee refractometer was a major improvement. Unfortunately, the device costs $400, which is more than I could justify to myself; but for a café that has already spent thousands upon thousands of dollars on espresso machines and grinders, spending $400 to ensure consistent quality is a small price.
The emergence of an objective measure of quality is powerful. 18%-22% extraction does not guarantee a great cup of coffee; the coffee itself still has to be good. But extraction yield is an objective evaluation of the brewing method, allowing for further empirical research into coffee brewing. Two significant results were presented at this year's Nordic Barista Cup. The first was a study by David Walsh reconfirming the validity of the 18%-22% extraction preference, while also suggesting a secondary preference for extractions at 12.5%-14.5%.
The second was an analysis by Vince Fedele of the liquid retained by the coffee grounds after brewing. The standard equation for calculating extraction yield from brew strength disregards any coffee extracted by the liquid retained by the spent coffee grounds. This assumption turns out to be roughly true of percolation brewing methods (drip, espresso), but not of infusion methods (e.g., French press, syphon/vacuum, Aeropress). When brewing by percolation, the liquid retained by the coffee has only been in contact with the coffee for a short time, and hence has extracted very little coffee. When brewing by infusion, on the other hand, the retained liquid has been in contact with the coffee for the entire brewing process. Therefore, the liquid retained by an infusion brewer has a significant quantity of coffee solids in solution; the retained liquid is coffee of essentially the same strength as the cup you just brewed. The standard extraction formula doesn't take this extra extraction into account. Practically, this means that to brew coffee to the same strength and extraction by infusion requires ~10% more ground coffee, to account for the brewed coffee that is retained by the grounds.
In addition to allowing cafés and consumers to improve their brewing practices, fast and easy measurement of extraction is a valuable tool for engineers developing coffee equipment. For example, soon after developing the VST refractometer, Vince Fedele used his invention to identify a major weakness in commercial espresso machines—the portafilter basket—and develop an improvement.
But more than anything else, I appreciate the development of the VST refractometer, and the renewed focus on extraction it brought with it, for the simplicity it provides. Though extraction is a complex concept, it is a single, measurable number which tracks quality of brewing methods.
There's one major caveat to these extraction numbers, which is that they're based on what our grinders actually produce. Even the best burr grinders on the market produce a significant quantity of grinds that are finer than desired. These fines extract more quickly than the rest of the coffee, which puts a limit on how high we can push our extraction yield without overextracting. If you have a low-quality grinder (e.g., a blade grinder), even an 18% extraction is going to taste over extracted, due to the wide variation in grind size. Experiments with sifting ground coffee, which removes the fines, suggest that a perfectly even grind would allow extraction up to 23% or 24%. (Matt Perger won this year's World Brewer's Cup with sifted coffee at 23% extraction.) But sifting is impractical in most settings, so until the next grinder revolution, we're stuck with a 22% ceiling.
There's one major caveat to these extraction numbers, which is that they're based on what our grinders actually produce. Even the best burr grinders on the market produce a significant quantity of grinds that are finer than desired. These fines extract more quickly than the rest of the coffee, which puts a limit on how high we can push our extraction yield without overextracting. If you have a low-quality grinder (e.g., a blade grinder), even an 18% extraction is going to taste over extracted, due to the wide variation in grind size. Experiments with sifting ground coffee, which removes the fines, suggest that a perfectly even grind would allow extraction up to 23% or 24%. (Matt Perger won this year's World Brewer's Cup with sifted coffee at 23% extraction.) But sifting is impractical in most settings, so until the next grinder revolution, we're stuck with a 22% ceiling.
Thursday, November 22, 2012
Coffee Processing Revisited
One of the first aspects of coffee to catch my attention was coffee processing, the steps involved in extracting the coffee seed (bean) from the fruit. I noticed that all of the coffees that I liked most at Peet's were either natural processed or wet-hulled. As I started drinking lighter roasts, my tastes turned to classically washed coffees. So clearly my original conception that the flavor of a coffee is just a result of how the coffee was grown and roasted was misguided.
However, I didn't have a good understanding of what the specific differences between different processing methods were, in large part due to ignorance about the steps involved and the plethora of synonymous terms used for processing methods. So I did some research and made a chart. Since then, I've discovered some finer-grained distinctions in processing methods, so at this point I think the information will probably be better presented in prose. All this information is available elsewhere, but I haven't found anywhere online where all of the details that I'm interested in have been collected in a concise and readable manner. If you're already familiar with the basics of coffee processing, you can skip this next bit.
Understanding the differences between processing methods requires understanding the steps involved in processing, which in turn requires understanding the anatomy of the coffee fruit. It starts out looking like this:

The outer skin of the coffee fruit is known as the pulp. The gooey flesh of the fruit inside the pulp is called mucilage. Inside the mucilage is a membrane surrounding the seed, known as parchment. What follows is a brief description of the five stages involved in coffee processing: pulping, fermentation, washing, drying, and hulling. Note that not all processing methods utilize all of these stages, as I will discuss below.
The pulping stage involves removing the skin of the fruit, which is done mechanically. Then comes fermentation, when the de-pulped fruit, the gooey mess you see below, is let sit to allow microbes to break down the mucilage.
 After fermentation, more water is used to wash off the loosened mucilage, and the result is parchment coffee, which is just the coffee seed and the innermost layer of parchment. The parchment coffee is then dried. (Dried parchment coffee shown below.)

Once dried, the parchment coffee is sent through hulling machines to remove the parchment, and the green coffee is ready to ship to the roaster.

1. Wet Process AKA Washed Coffee:
The vast majority of arabica coffee is wet processed. What characterizes all wet processing methods is the use of water to remove the mucilage. The most significant differences between different wet processing methods are: length of fermentation; whether water is added during fermentation (dry fermentation vs. wet fermentation); and moisture content at hulling. Wet processing is the most consistent method of producing defect-free coffee.
1.1 Latin American method
The coffee is pulped, then dry fermented for up to 24 hours. Water is introduced to wash off the loosened mucilage, followed by drying and hulling.
1.2 Kenyan method
The coffee is pulped, then dry fermented for up to 3 days. Water is used to wash the coffee, which is then soaked for 24 hours. The parchment coffee is then dried and hulled.
1.3 Ethiopian method
The coffee is pulped, then wet fermented for up to 3 days. More water is used to wash the coffee, which is then dried and hulled.
1.4 Wet-hulling (Indonesian method)
The coffee is pulped, then dry fermented overnight (usually; my sources conflict on this). The coffee is hand-washed, followed by a short period of drying. The parchment coffee is hulled before it has fully dried (i.e., more than 11% moisture remains), leaving the green coffee exposed to the environment while still moist and hence bacteria-friendly. This process results in increased body, lower acidity, and a distinctly rustic, earthy character.
1.5 Machine-assisted wet process
Some farms use elaborate machines called mechanical demucilagers to pulp and wash the coffees all at once, without a distinct fermentation stage. These can also be used to only partially remove the mucilage, resulting in a coffee that rests somewhere between washed and pulped natural. This type of coffee is sometimes called honey processed, though that term is also used to describe pulped naturals, a dry processing method.
A note on semi-washed. This term is the cause of much confusion in discussions of coffee processing. It is used to refer to either wet-hulled coffee or coffee that has been partially demucilaged mechanically, two distinct processes that produce dramatically different coffees. I prefer to avoid the term altogether.
2. Dry Process:
Dry processed coffees are produced without removing the mucilage prior to drying.
2.1 Natural Process
The coffee is not pulped after picking; rather, it is immediately laid out to dry in the sun, a stage which lasts for 2-4 weeks. When the coffee has fully dried, it is sent through a hulling machine, which removes the pulp, mucilage, and parchment all at once. Like wet-hulling, this process results in increased body and lower acidity, but generally has a bit less earthiness, greater complexity and can result in intense dark berry and wine-like flavors.
Most natural processed arabica comes from Yemen, Ethiopia, and Brazil. Brazilian natural and pulped natural coffee forms the base of most classic espresso blends. There is an important distinction between the way that Brazilian and Ethiopian natural processed coffee is generally harvested. In Ethiopia, the coffee is hand-picked over a period of time to ensure that all the coffee is at the same level of ripeness when picking, while in Brazil, farmers generally wait until the coffee is extremely ripe and then mechanically strip-pick the trees, which means that many of the coffee cherries have already begun to dry on the branches. Brazilian naturals tend to be nutty and mild, while Ethiopian naturals tend to be powerfully fruity.
2.2 Pulped Natural AKA Honey Process
The coffee is pulped after picking. When the coffee is dry, a hulling machine removes the mucilage and parchment. The flavor of pulped natural coffee rests between washed and natural processed coffee. Pulped natural coffee is produced around the world but is especially associated with Brazil.
Drying Methods
All dry processed coffee and most high-quality wet-processed coffee is sun-dried. Confusingly, sun-dried is sometimes used as a synonym for natural processed. African farmers usually dry their coffee on raised beds, while Latin American coffees are generally dried on cement patios.

Sources:
An interview with Peter Giuliano which can be found on James Hoffman's blog (main source)
http://timwendelboe.no/tag/coffee-processing/
http://www.coffeereview.com/article.cfm?ID=199
http://coffeeshrub.com/shrub/blog/confused-naturally
However, I didn't have a good understanding of what the specific differences between different processing methods were, in large part due to ignorance about the steps involved and the plethora of synonymous terms used for processing methods. So I did some research and made a chart. Since then, I've discovered some finer-grained distinctions in processing methods, so at this point I think the information will probably be better presented in prose. All this information is available elsewhere, but I haven't found anywhere online where all of the details that I'm interested in have been collected in a concise and readable manner. If you're already familiar with the basics of coffee processing, you can skip this next bit.
Understanding the differences between processing methods requires understanding the steps involved in processing, which in turn requires understanding the anatomy of the coffee fruit. It starts out looking like this:

The pulping stage involves removing the skin of the fruit, which is done mechanically. Then comes fermentation, when the de-pulped fruit, the gooey mess you see below, is let sit to allow microbes to break down the mucilage.


1. Wet Process AKA Washed Coffee:
The vast majority of arabica coffee is wet processed. What characterizes all wet processing methods is the use of water to remove the mucilage. The most significant differences between different wet processing methods are: length of fermentation; whether water is added during fermentation (dry fermentation vs. wet fermentation); and moisture content at hulling. Wet processing is the most consistent method of producing defect-free coffee.
1.1 Latin American method
The coffee is pulped, then dry fermented for up to 24 hours. Water is introduced to wash off the loosened mucilage, followed by drying and hulling.
1.2 Kenyan method
The coffee is pulped, then dry fermented for up to 3 days. Water is used to wash the coffee, which is then soaked for 24 hours. The parchment coffee is then dried and hulled.
1.3 Ethiopian method
The coffee is pulped, then wet fermented for up to 3 days. More water is used to wash the coffee, which is then dried and hulled.
1.4 Wet-hulling (Indonesian method)
The coffee is pulped, then dry fermented overnight (usually; my sources conflict on this). The coffee is hand-washed, followed by a short period of drying. The parchment coffee is hulled before it has fully dried (i.e., more than 11% moisture remains), leaving the green coffee exposed to the environment while still moist and hence bacteria-friendly. This process results in increased body, lower acidity, and a distinctly rustic, earthy character.
1.5 Machine-assisted wet process
Some farms use elaborate machines called mechanical demucilagers to pulp and wash the coffees all at once, without a distinct fermentation stage. These can also be used to only partially remove the mucilage, resulting in a coffee that rests somewhere between washed and pulped natural. This type of coffee is sometimes called honey processed, though that term is also used to describe pulped naturals, a dry processing method.
A note on semi-washed. This term is the cause of much confusion in discussions of coffee processing. It is used to refer to either wet-hulled coffee or coffee that has been partially demucilaged mechanically, two distinct processes that produce dramatically different coffees. I prefer to avoid the term altogether.
2. Dry Process:
Dry processed coffees are produced without removing the mucilage prior to drying.
2.1 Natural Process
The coffee is not pulped after picking; rather, it is immediately laid out to dry in the sun, a stage which lasts for 2-4 weeks. When the coffee has fully dried, it is sent through a hulling machine, which removes the pulp, mucilage, and parchment all at once. Like wet-hulling, this process results in increased body and lower acidity, but generally has a bit less earthiness, greater complexity and can result in intense dark berry and wine-like flavors.
Most natural processed arabica comes from Yemen, Ethiopia, and Brazil. Brazilian natural and pulped natural coffee forms the base of most classic espresso blends. There is an important distinction between the way that Brazilian and Ethiopian natural processed coffee is generally harvested. In Ethiopia, the coffee is hand-picked over a period of time to ensure that all the coffee is at the same level of ripeness when picking, while in Brazil, farmers generally wait until the coffee is extremely ripe and then mechanically strip-pick the trees, which means that many of the coffee cherries have already begun to dry on the branches. Brazilian naturals tend to be nutty and mild, while Ethiopian naturals tend to be powerfully fruity.
2.2 Pulped Natural AKA Honey Process
The coffee is pulped after picking. When the coffee is dry, a hulling machine removes the mucilage and parchment. The flavor of pulped natural coffee rests between washed and natural processed coffee. Pulped natural coffee is produced around the world but is especially associated with Brazil.
Drying Methods
All dry processed coffee and most high-quality wet-processed coffee is sun-dried. Confusingly, sun-dried is sometimes used as a synonym for natural processed. African farmers usually dry their coffee on raised beds, while Latin American coffees are generally dried on cement patios.

An interview with Peter Giuliano which can be found on James Hoffman's blog (main source)
http://timwendelboe.no/tag/coffee-processing/
http://www.coffeereview.com/article.cfm?ID=199
http://coffeeshrub.com/shrub/blog/confused-naturally
Saturday, October 6, 2012
Roasting Update
I continue to enjoy roasting my own coffee. My batch size is ~65g of roasted coffee, which only lasts me 2–3 days, so I've been roasting several times a week. A couple of weeks ago I decided to modify the popper by bypassing the thermostat, which automatically shuts off the heating element when it gets too hot. I want the popper to get really hot, so the thermostat had to go. One piece of heat-shrink tubing later, the popper was back and better than ever. It now gets hot enough that I don't need to use the lid at all, which gives me a better view of the coffee. One of the best parts of homeroasting is watching the coffee change color as it roasts.


Since I don't have any way to directly measure the temperature of the coffee as it roasts, in order to gain control over my roasting I try to keep track of as many variables as I can. The easiest way to do this is to keep a log.
As you might be able to tell, I haven't had much luck with darker roasts in the popper. I'm not sure if I've lost my taste for dark roasts or if the popper just roasts too quickly to produce a good dark roast. I suspect it's some combination of the two. In any case, I'm happy with the results I've been getting stopping the roast 10 - 60 seconds after the end of first crack (corresponding to a City – Full City roast). I've also tried going lighter, but the very light roasts I've tried (stopping the roast before or during first crack) have been too bready and mild for my taste. The Burundi is definitely my favorite of the four coffees I got from Sweet Maria's. I've discovered that Jones Coffee Roasters (Pasadena) and Klatch Coffee (Upland) also sell green coffee by the pound. I'm excited to get more!
Update: Jones Coffee Roasters no longer sells green coffee. Ordered 5 lbs wet processed Guatemala, 5 lbs wet processed Ethiopia from Sweet Maria's.

This is the Costa Rica. The coffee starts out a pale shade of green.

In the first stage of roasting, the beans turn bright yellow.

As the roast continues, the beans darken to golden brown.

The beans here are nearing first crack. At this point I stop shaking the popper. Shaking the popper in the beginning lengthens the early stages of the roast for more flavor development and helps to ensure evenness.


Once the beans have reached the desired roast (this is Full City, I think), they should be cooled as quickly as possible. The most effective method I've found is to swirl them around a colander (convection cooling) until they're merely warm to the touch, then spread them onto a flat metal surface (conduction cooling) until they reach room temperature. After cooling, I put the coffee in a labeled and dated mason jar. It's important not to seal the jar fully, because the beans release a lot of CO2 after roasting, and exploding jars are no fun.

Since I don't have any way to directly measure the temperature of the coffee as it roasts, in order to gain control over my roasting I try to keep track of as many variables as I can. The easiest way to do this is to keep a log.
| Coffee | Ambient˚ | Mass (1) | Mass (2) | Shaking | 1st Crack Start | 1st Crack End | 2nd Crack | Pull Time | Notes |
| Java | 2:00 | 3:45 | 5:00 | 6:00 | 6:00 | Blech! | |||
| Burundi | 86F | 75g | 4:00 | 4:17 | 5:20 | 6:05 | Good, but more mild than lighter roast | ||
| Brazil NP | 84F | 75g | 4:00 | 4:00? | 5:10 | Still very uneven color, but balanced flavor | |||
| Burundi | 82F | 75g | 3:54 | 3:54 | 5:17 | 5:17 | |||
| Java | 83F | 75g | 5:00 | 5:15 | ? | 6:55 | A bit ashy, but drinkable | ||
| Java | 88F | 75g | 62g | 4:00 | 4:45 | 6:00? | 6:30 | Good balance | |
| Costa Rica | 79F | 75g | 3:00 | 3:40 | 4:55 | 5:10 | Pretty light, definitely city | ||
| Costa Rica | 76F | 75g | 64g | 3:30 | 4:18 | 5:45 | 6:30 | ||
| Costa Rica | 76F | 75g | 66g | 4:45 | 5:26 | 7:09 | 7:26 | 3 stops before 1st crack |
As you might be able to tell, I haven't had much luck with darker roasts in the popper. I'm not sure if I've lost my taste for dark roasts or if the popper just roasts too quickly to produce a good dark roast. I suspect it's some combination of the two. In any case, I'm happy with the results I've been getting stopping the roast 10 - 60 seconds after the end of first crack (corresponding to a City – Full City roast). I've also tried going lighter, but the very light roasts I've tried (stopping the roast before or during first crack) have been too bready and mild for my taste. The Burundi is definitely my favorite of the four coffees I got from Sweet Maria's. I've discovered that Jones Coffee Roasters (Pasadena) and Klatch Coffee (Upland) also sell green coffee by the pound. I'm excited to get more!
Update: Jones Coffee Roasters no longer sells green coffee. Ordered 5 lbs wet processed Guatemala, 5 lbs wet processed Ethiopia from Sweet Maria's.
Wednesday, September 12, 2012
Roasting Coffee
Now that I don't get free coffee every week, coffee beans have become a significant expense. Coffee at Intelligentsia, which is the nearest obsessive coffee shop to my apartment, often runs upwards of $20 per 12 ounce bag. Very high-quality green coffee from Sweet Maria's (a home roasting supply shop in Oakland) averages around $5 – $7 per pound. So home roasting makes economic sense. More importantly, home roasted coffee is the freshest of all coffee. I plan on roasting at least twice a week. Right now I'm roasting every day.
Of course, saving $15 a week isn't a big deal if you're going to spend $1000 on a coffee roaster. Fortunately, there are some makeshift alternatives that yield quite good results. In the past I've done some stovetop roasting, using a saucepan with a lid and an oven thermometer. Stovetop roasting approximates a drum-roasting environment (most commercial roasters are heated rotating drums), with roast times between 12 and 25 minutes. There are a few drawbacks to stovetop roasting, however. Even with a clear lid, it is very difficult to judge the beans' color, because the lid quickly fogs up. It's also difficult to achieve an even roast, though I've gotten pretty close by careful shaking of the pan. I'm sure my use of a heavy bottomed saucepan (clad copper or aluminum) helps with even heat distribution.
Another device that home roasters have discovered to work very well for roasting coffee is the electric popcorn popper. These devices shoot hot air through the popcorn (or coffee), both heating and circulating simultaneously. Air roasters roast much more quickly, in the range of 4 – 10 minutes. A faster roasting time generally means a lighter bodied, livelier coffee, so this method is well-suited to delicate wet-processed coffees and a light to medium roast. However, popcorn poppers have no built-in mechanism for adjusting heat levels, which depend mainly on the voltage of the outlet the popper is plugged into. Some home roasters adjust heat levels by putting on and taking off the lid, while others install heat dimmers and thermocouples. One can only roast 3 – 4 ounces of beans at a time in a popper, and it should not be used for consecutive roasts, lest the fan and heating element give out.

I recently bought a popcorn popper from Sweet Maria's (the West Bend Air Crazy, to be specific), but I plan to continue using both methods, at least until I decide that one is better than the other. Along with the popper, Sweet Maria's sent a sampler of 4 different pounds of green coffee: a dry-processed Brazilian peaberry; a wet-processed Java; a wet-processed Costa Rica; and a wet-processed Burundi. I think the Java and Brazil might benefit from stovetop roasting in order to emphasize their body and sweetness, while I expect the fruity acidity of the Costa Rica and Burindi to shine with an air roast.

There are various levels to which coffee may be roasted. These levels are generally determined by color, taste, and sound. At 400˚F the beans emit a loud popping noise, known as first crack. Stopping the roast immediately after first crack finishes results in a City Roast. Roasting further will result in (sequentially) City+, Full City, and Full City+. At 440˚F, the beans emit a snapping sound, known as second crack. Roasting into second crack will result in a dark roast. If one stops roasting during the second crack, the result is a Vienna Roast, which is a popular roasting level for espresso (it's also the level to which Peet's roasts most of its beans). Roasting further results in a French or Italian Roast, terms which are used inconsistently with respect to each other but always refer to a very dark roast. At this point, most of the flavor of the beans will be eclipsed by the flavor of the roast, though some coffees, such as wet-hulled Indonesians, are so pungent that the bean flavor is very evident even in a dark roast. As well as contributing flavor, higher levels of roasting increase body (at least up to a Full City Roast) and lower the perception of acidity (AKA 'brightness'; 'liveliness').

Of course, saving $15 a week isn't a big deal if you're going to spend $1000 on a coffee roaster. Fortunately, there are some makeshift alternatives that yield quite good results. In the past I've done some stovetop roasting, using a saucepan with a lid and an oven thermometer. Stovetop roasting approximates a drum-roasting environment (most commercial roasters are heated rotating drums), with roast times between 12 and 25 minutes. There are a few drawbacks to stovetop roasting, however. Even with a clear lid, it is very difficult to judge the beans' color, because the lid quickly fogs up. It's also difficult to achieve an even roast, though I've gotten pretty close by careful shaking of the pan. I'm sure my use of a heavy bottomed saucepan (clad copper or aluminum) helps with even heat distribution.
Another device that home roasters have discovered to work very well for roasting coffee is the electric popcorn popper. These devices shoot hot air through the popcorn (or coffee), both heating and circulating simultaneously. Air roasters roast much more quickly, in the range of 4 – 10 minutes. A faster roasting time generally means a lighter bodied, livelier coffee, so this method is well-suited to delicate wet-processed coffees and a light to medium roast. However, popcorn poppers have no built-in mechanism for adjusting heat levels, which depend mainly on the voltage of the outlet the popper is plugged into. Some home roasters adjust heat levels by putting on and taking off the lid, while others install heat dimmers and thermocouples. One can only roast 3 – 4 ounces of beans at a time in a popper, and it should not be used for consecutive roasts, lest the fan and heating element give out.


There are various levels to which coffee may be roasted. These levels are generally determined by color, taste, and sound. At 400˚F the beans emit a loud popping noise, known as first crack. Stopping the roast immediately after first crack finishes results in a City Roast. Roasting further will result in (sequentially) City+, Full City, and Full City+. At 440˚F, the beans emit a snapping sound, known as second crack. Roasting into second crack will result in a dark roast. If one stops roasting during the second crack, the result is a Vienna Roast, which is a popular roasting level for espresso (it's also the level to which Peet's roasts most of its beans). Roasting further results in a French or Italian Roast, terms which are used inconsistently with respect to each other but always refer to a very dark roast. At this point, most of the flavor of the beans will be eclipsed by the flavor of the roast, though some coffees, such as wet-hulled Indonesians, are so pungent that the bean flavor is very evident even in a dark roast. As well as contributing flavor, higher levels of roasting increase body (at least up to a Full City Roast) and lower the perception of acidity (AKA 'brightness'; 'liveliness').

My first two roasts with the popper. Left: Costa Rica (City Roast); Right: Java (City+)
Tuesday, August 14, 2012
Iced Coffee, Part 1: Hypotheses
In preparation for further brewing of coffee stouts, I've decided to again try to master iced coffee. In this post, I will summarize the hypotheses I've come up with to explain my previous experiences with making iced coffee, and lay out future plans for testing these hypotheses.
The challenges of iced coffee emerge chiefly from two sources: oxidation and under-extraction. Oxidation results in the acrid taste of stale coffee, and is a function of oxygen exposure, time, and temperature. Oxidation is a concern for cold-brewed coffee because of the long brewing times necessary to achieve proper levels of extraction. Oxidation is also a concern for hot-brewed iced coffee if it isn't chilled immediately, because oxidation occurs much more rapidly at high temperatures. Oxidation is especially worrying for me, because the effects of oxidation increase over time, and I want my coffee stouts to last much longer than iced coffee is expected to.
Extraction refers to the percentage of solids dissolved into the water during brewing. One intuitive way to think about extraction is as brewing efficiency—but higher efficiency is not always better. According to the SCAA, ideal extraction is about 20% (interestingly, this is true for both brewed coffee and espresso). Coffee with much less than 20% extraction is said to be under-extracted; coffee with much more than 20% extraction is said to be over-extracted, which is even worse.
Extraction is a function of a number of variables, including: brew ratio (coffee-to-water ratio), grind, water temperature, brew time, and agitation. Crucially, brew strength is distinct from amount of extraction: strength equals brew ratio multiplied by amount of extraction. Therefore, if a high enough brew ratio is used, it is quite easy to make very strong but under-extracted coffee, as in the top left corner of this chart:
Under-extraction in brewed coffee often yields a musty or tea-like aroma that I find particularly unpleasant at cold temperatures.
One method of brewing iced coffee that has become popular recently—sometimes under the moniker 'Japanese iced coffee'—is to brew hot coffee directly onto ice, compensating for the dilution the ice produces by using half the usual amount of brewing water. I've tried this method many times over the past few months, using both Hario V60 brewers and press pots, with consistently disappointing results. Specifically, every attempt yielded coffee with the musty aroma that I now (tentatively) identify as under-extraction. Varying the amount of coffee I used didn't seem to help.
So why did the brew-onto-ice method fail? The problem, I think, is this: by reducing the amount of brewing water so dramatically, the percentage of solids extracted from the coffee grounds dropped precipitously. Less hot water passing through the coffee, less solids extracted from the coffee.
There is, therefore, a trade-off inherent in the brew-onto-ice method. Keeping the total coffee-to-water ratio constant, one can vary the ratio of hot water to ice. (Note that ice should always be measured in weight, since the amount of ice in a given volume will vary depending on the size of the ice cubes.) Adding more hot water and less ice will result in better extraction, but also slower chilling of the coffee, possibly leading to oxidation. Adding more ice and less hot water will result in faster chilling, and hence less risk of oxidation, but also lower extraction. I believe that there is a ratio (or range of ratios) at which neither under-extraction nor oxidation are major concerns, but I have yet to determine where this sweet spot lies.
One strategy to compensate for the decrease in extraction caused by the reduction in hot water is to use a finer grind. This is a technique already in use by my former employer, but until now I did not fully understand the reasoning behind it. Using a finer grind increases the strength of the coffee by raising extraction, while reducing the amount of water (or increasing the amount of coffee) increases the strength of the coffee but decreases extraction. In order to maintain optimal extraction, therefore, an increase in the brew ratio should always be accompanied by a finer grind and/or an increase in brewing time. (In drip methods of brewing, a finer grind also increases the brewing time.) This is a bit counter-intuitive, but I'm pretty sure it's true!
In order to test these ideas and try to make better iced coffee (and hence better coffee stouts) I plan to brew iced coffee using several different methods.
1. Traditional cold-brew. 80 grams of coffee per liter of room temperature water. Medium grind. 18 hour brew time (room temperature).
2. Barismo-style cold-brew. 80 grams of coffee per liter of 40˚F water. Medium grind. 18 hour brew time (refrigerated).
3. Hario V60 brew-onto-ice. 50 grams of coffee per liter of total water. (Variable hot water/ice ratio). Medium-fine/fine grind.
4. Full-immersion hot brew poured onto ice. 50 grams of coffee per liter of total water. (Variable hot water/ice ratio). Medium-fine grind (or medium-fine/fine grind for a direct comparison with method 3).
In order to filter the cold-brewed and full-immersion coffee I will probably just use the Hario. Any oxygen introduced shouldn't affect the flavor in the short-term. In any case, I will taste the coffee before and after filtration. In the long run I would like to find a way to filter without exposure to air, and without having to use a coarse grind (as a press would require). Hario makes an iced coffee maker called the Mizudashi that might work. The Eva Cafe Solo is also an option. Or a cotton sack, perhaps.
Results to come.
Subscribe to:
Posts (Atom)